Tours: Advanced Configurations
Whether you're working with a single-page application, a responsive web platform, or a complex interface with multiple views, these configuration strategies will help you ensure that your tours appear exactly where and when they should. From handling dynamic URLs to designing mobile-specific experiences and navigating the challenges of iframe targeting, this guide covers the nuanced approaches to tour configuration.
Dynamic URLs
Tours and Hints tools are bound to URLs in your application. This allows you to tailor the URL templates precisely to your application's needs, ensuring that tours and hints appear exactly where they should. Ignoring URL addresses could cause tour cards or hints to display randomly, which is not desirable. URLs are automatically populated in the URL template as you create cards in the editor.
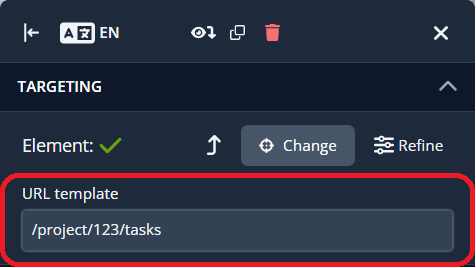
However, there may be situations where you need to verify the content of the URLs.
Applications often use dynamic URLs, which can vary for different users, projects, or other entities. For example, in a project management application with a tasks feature, you might encounter a URL like this:
https://example.com/projects/123/tasks
This URL is a typical example of a dynamic address (notice the 123). As users select different projects, the number changes. Assigning this URL to a card means it will only display for that particular project.
To address this, dynamic parameters can be replaced with special placeholders that indicate variable sections of the URL.
The Dynamic placeholder
The [dynamic] placeholder is the most commonly used. Generally, you don't need to replace it manually because we try to detect dynamic parameters automatically (replacing all numeric values and some special cases). However, it's always good to verify the final URL template. It might look like this:
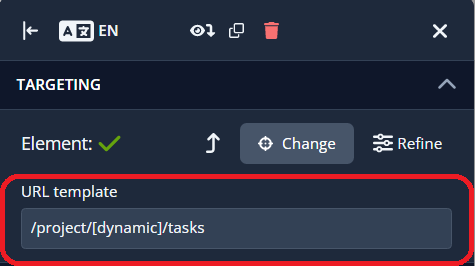
The [dynamic] placeholder replaces everything from its position to the end of the URL. If you need to replace only a specific segment of the URL without affecting the rest, you should use the [urlsegment] placeholder instead.
The Dynamic Number Placeholder
Maybe you have a specific use case in which the [dynamic] placeholder will not be sufficient e.g. you want to show users a survey after they've completed a checkout process, but the dynamic URL contains a string of numbers.
Example: https://example.com/orders/1234 but using the [dynamic] placeholder will cause your survey to appear too early in the process, before the user has paid for the items in their cart.
Example: https://example.com/orders/cart/1234
In this case, you will want to use the [dynamic:num] placeholder:
Example: https://example.com/orders/[dynamic:num]
This will ensure your survey only shows after the user has completed their purchase and lands on the finished order page.
The URL Segment placeholder
The [urlsegment] placeholder is used to replace a specific part of the URL without affecting the rest. This allows for more precise URL templates. For example:
https://example.com/projects/[dynamic]/tasks/[dynamic]- This would stop the URL path afterprojects/[dynamic].https://example.com/projects/[urlsegment]/tasks/[urlsegment]- This maintains the structure of the entire URL, only replacing the specified segments.
This flexibility is useful when only a segment of the URL changes dynamically while the rest remains constant.
The Specific placeholder
The [specific] placeholder is used when you need to refer to custom context attributes. For instance, if you want to launch a tour from our Life Ring Button on any page in your application, Product Fruits needs to know how to construct the URL to redirect to when users click on the tour launcher. This is not possible with the [dynamic] placeholder because the exact value is unknown. To solve this, you can provide Product Fruits with custom properties. In this case, the custom properties would act as constructors for the URL, specifying what value should be inserted. More details about how these properties can be found here.
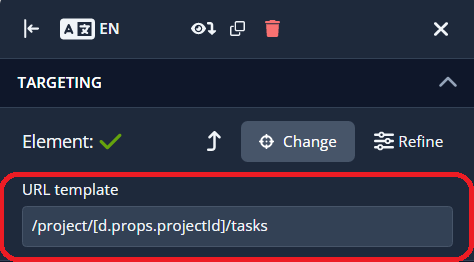
Once these attributes are available, you can use them as placeholders. For instance, if you provide a projectId custom property, you can refer to this property in the URL template field as [d.props.projectId]. For example:
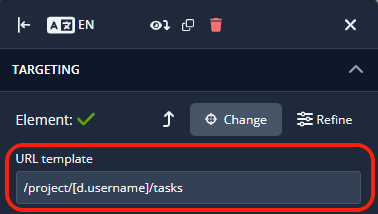
In the case that you are using built-in user properties, such as the username, you only need to refer to it as [d.username].
In addition to the URL template field, specific placeholders can also be used in other parts of Product Fruits, such as URL filters and within text content. Here, the syntax changes slightly. Instead of using the [d.props.propertyName] format, you should use double curly brackets {{}}. For example, to refer to a custom property, you would use {{props.propertyName}}. To refer to a built-in property like the username, you would simply use {{username}}. This syntax allows you to dynamically insert user-specific information into various parts of the tool, enhancing the flexibility and relevance of your content.
How to Design Tours for Mobile Web
A lot of web applications have their own mobile version. Not only is the UI (typically) different with much less space on the screen, it's also possible for the elements on the mobile version of the editor to require different CSS selectors. Therefore, in most applications, it's best to design a different tour for the mobile version.
Segmenting tours based on device type
- Go to the tour details by clicking on the tour name in the tours list.
- Find the Targeting section and click Custom Rules
- In this section, click on Add condition and select Device type
- Select the is operator and select Mobile
Now the tour is ready to be displayed on mobile version only.
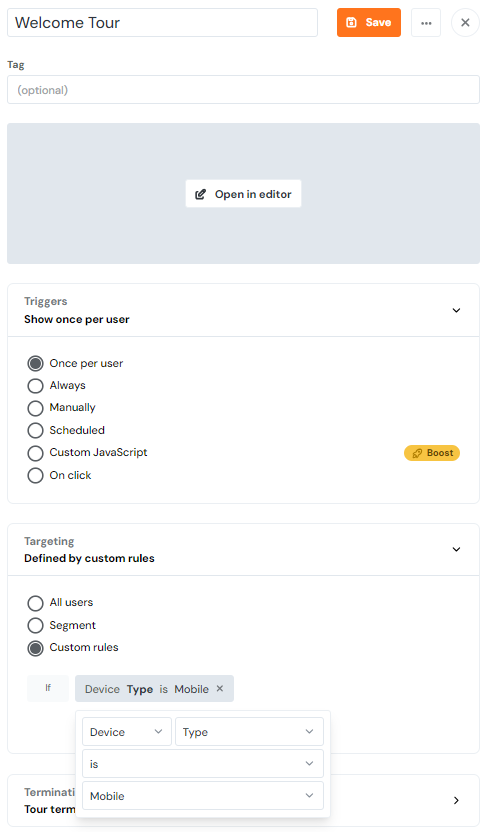
We consider the device to be mobile when the viewport width is lower than 768px.
Designing the tour
We recommend using Chrome DevTool's built-in device emulation mode. It allows you to view your application as it would appear on a real mobile device.
- While the editor is open, open up Chrome DevTools. There are several ways to do this:
- Turn on the function key and press F12
- Ctrl/Command + Shift/Option + I
- Right-click somewhere in the web application and select Inspect in the dropdown menu
- In DevTools, click on the Toggle device emulation button. It is the second option in the top left. If this option is not present please see the note at the bottom of this article.
Now, the device emulation mode should be on. You should see something similar to this:
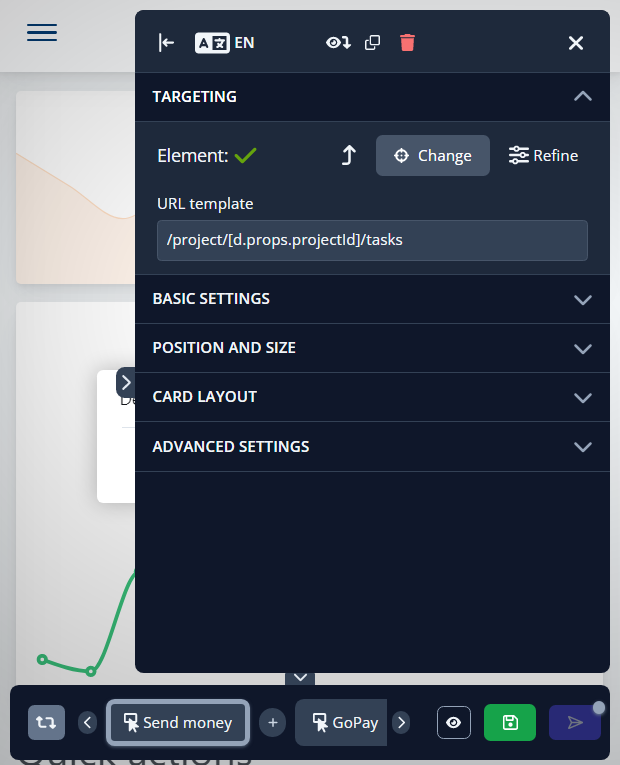
If the editor is taking up too much of the viewport, select Responsive from the Dimensions dropdown at the top and adjust the size of the emulated viewport.
If the option for entire mobile emulation mode is not present, please try navigating directly to the page where you'd like to edit the tour in a new tab and launch the editor from your extensions tool bar. As seen below:

Targeting Elements in iFrames
Iframes are tricky for us to handle, and thus this feature is disabled by default. If your application uses iframes, contact us and we can enable this experimental functionality for you, but we are only able to offer this functionality as is.
Product Fruits tour and hint target elements can be placed inside of iframes. Once iframes support is active (contact us for activation), you can create and target steps/hints as normal. The only visible difference is that you will see a new parent CSS selector field for the iframe in the editor.
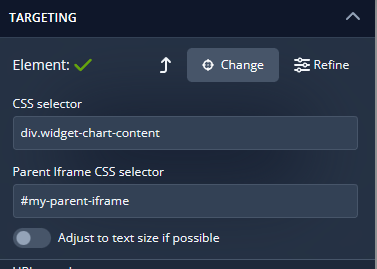
However, there are some limitations due to the security restrictions of internet browsers.
Limitations
The biggest limitation is the same origin policy. Browsers don't allow interaction with iframe content from the parent application if the same origin rule doesn't match. That means:
- The targeted iframe must be loaded from the same domain as the application. For example, if the application runs at
my-app.example.com, the iframesrcmust be also loaded frommy-app.example.com - Due to changes in browser security features, only same origin iFrames can be supported. There is no longer a known way to work around this limitation.
- If domains are different (e.g. you are using Google Maps and you want to target something in the map view), there is no way to target elements inside the iframe.

