HubSpot Chat
HubSpot chat integration requires some coding on your side because the HubSpot chat API is quite limited. It prevents us from creating a full integration on our side.
This integration takes advantage of their chat embedding feature. You must create an element, host the HubSpot chat in it, and handle the display state.
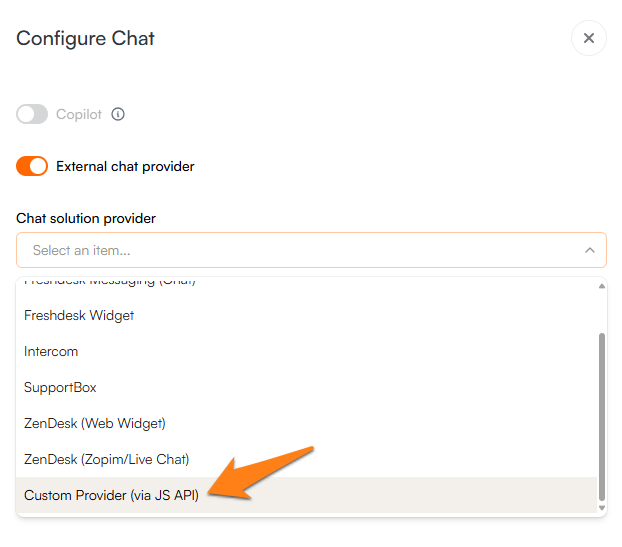
First, select the Custom provider option in the Life Ring Button settings.
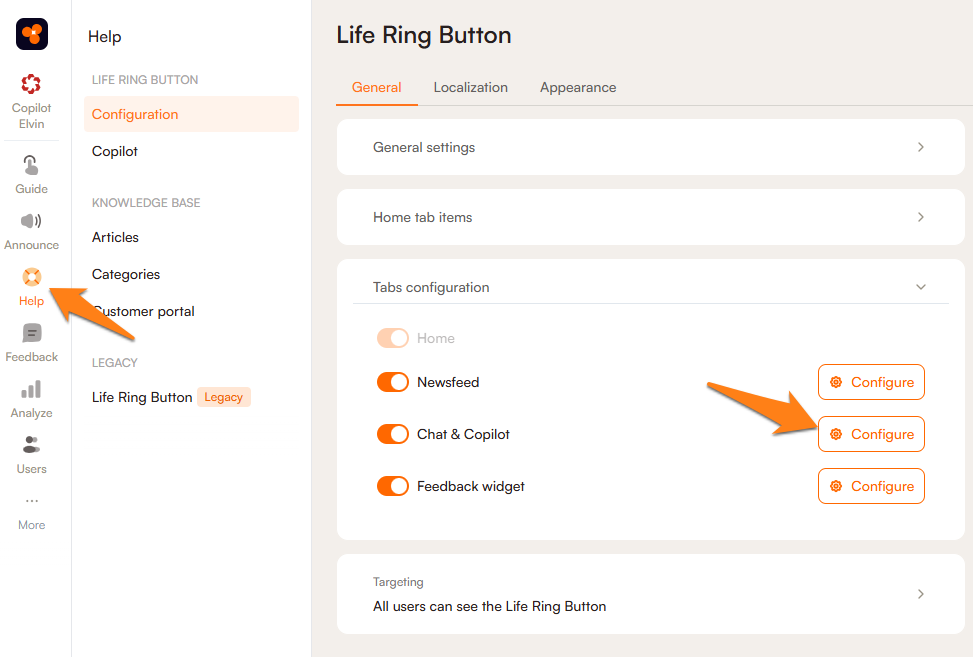
- Go to Help widgets -> Life Ring Button
- Click on the Tabs configuration dropdown.
- Enable the Chat Integration button and click Configure.
- On the next screen, select your Custom Provider (via JS API). If you don't see it, scroll down, as it is the last menu item in the dropdown.


This is where some coding becomes necessary.
This is a small working example of the integration with comments (the code should be in the <body> element):
<!-- Define the HubSpot chat panel root element. This element will be holding the HubSpot chat frame -->
<div id="hubspot-chat-holder" style="position: fixed; right: 30px; bottom: 30px; background-color: white; visibility: hidden">

	<button onclick="onHubspotClosed()">Close</button>

	<!-- This element will be holding the HubSpot chat -->
    <div id="hubspot-chat" style="height: 500px; width: 300px;">
    </div>
</div>
<!-- Add some styles. This enlarges the HubSpot chat itself. -->

<style>
    #hubspot-conversations-inline-iframe {
        width: 300px;
        height: 500px;
        border:none;
    }
</style>

<!-- This is HubSpot configuration object. It tells HubSpot to embed the chat to the #hubspot-chat element (we created it above) -->
<script>
	window.hsConversationsSettings = {
    	loadImmediately: true,
    	inlineEmbedSelector: '#hubspot-chat'
    };


	// This code handles the Custom Chat provider settings. See the Custom Provider section in our help docs.
    const hubspotHolder = document.getElementById('hubspot-chat-holder');
    window.addEventListener('productfruits_button_ext_widget_init', () => {
       	hubspotHolder.style.visibility = ''; // if we get signal from PF Life Ring button, show the HubSpot element
    });


/* This method is called by the Close button, it hides the HubSpot element and shows the Life Ring button again */
    function onHubspotClosed() {
       	hubspotHolder.style.visibility = 'hidden';
       	window.productFruits.api.inAppCenter.show();
    }
</script>


<!-- This part is about getting a notification, when the HubSpot chat is closed and the user will get a message -->
<script type="text/javascript">
   	function onConversationsAPIReady() {
       	window.HubSpotConversations.on('unreadConversationCountChanged', payload => {
   			if (payload.unreadCount > 0) {
   				// You should notify the user about the new chat, if the popup with the chat is closed.
   				// For instance, you can show another element.
   			}
   		});
   	}

   	if (window.HubSpotConversations) {
   		onConversationsAPIReady();
   	} else {
		window.hsConversationsOnReady = [onConversationsAPIReady];
   	}
</script>

<!-- Start of HubSpot Embed Code -->
<script type="text/javascript" id="hs-script-loader" async defer src="//js-eu1.hs-scripts.com/XXXXXX.js"></script>
<!-- End of HubSpot Embed Code -->
Highlights
- You must create holder elements for the HubSpot chat
- You will need to use the inlineEmbedSelector feature of the HubSpot chat. This will embed the chat into your element
- You can listen for the unreadConversationCountChanged event to show notifications
