
User Permissions and Role Management
Previously, Product Fruits operated with a simple permissions structure, featuring two roles: Manager and Editor. Only Managers could invite teammates, but this setup occasionally resulted in more users having access to edit and publish content than necessary, increasing the risk of human error and accidental publishing.
We're introducing an enhanced user permissions model to address these challenges and provide a better solution for all our clients. This update offers more precise control over workspace access, ensuring permissions are assigned to the right individuals. While especially valuable for larger teams, this model will benefit organizations of all sizes by minimizing the risk of unintended actions and improving the overall management of user permissions.
Who Can Access this Feature?
This feature is currently available exclusively to companies on the Business or legacy Enterprise plans.
For clients on the Starter and Pro, as well as legacy Core and Boost plans, the existing permissions structure remains in place. These plans continue to offer two roles:
- Manager: Responsible for managing members and billing, in addition to publishing content.
- Editor: Can publish content.
These permissions cannot be customized on plans below Enterprise.
To access this feature, please reach out to our Support Team or contact your Account Manager.
General Concept
The model defines four permissions: publish, edit, view, and none. It also includes two default roles: Owner and Viewer. These roles cannot be deleted, nor can the permissions assigned to them be changed. Owners will create additional roles, name them, and determine which permissions are assigned to each role.
Below is an example of how a content team could be structured and the possible permissions for each role. The italicized roles (Owner and Viewer) represent the default ones, which cannot be modified or deleted. The table also displays example roles for illustrative purposes and can be adjusted based on your team's structure.
| Publish | Edit | View | Billing + Members | |
|---|---|---|---|---|
| Owner | ✔ | ✔ | ✔ | ✔ |
| Viewer | ✔ | |||
| Content Manager | ✔ | ✔ | ✔ | |
| Content Writer | ✔ | ✔ | ||
| Content Marketing Intern | ✔ |
Owner
- Owners have permissions to publish, edit, and view content in each workspace, as well as manage billing
- There can be an unlimited number of Owners, but at least one Owner must be designated
- Only Owners can create and rename roles, assign permissions to those roles, assign roles to users, elevate or revoke permissions, and delete or deactivate users
- They can also assign permission directly from join requests
Viewer
- New users who are invited but haven't been assigned a specific role upon joining will automatically receive the Viewer role upon joining
- If a role is deleted, users previously assigned to it will revert to the Viewer role
Behavior
- Roles are assigned at the workspace level. A user can hold only one role per workspace but may have different roles across various workspaces within the company
- Permissions are not feature-specific; they apply to all products within a workspace. For example, if a user is granted permission to publish, this applies across all features, not just one, such as the newsfeed or tours
- Users can view the roles assigned to others, but only Owners can manage these
- Owners can update user permissions in bulk by selecting a workspace and multiple users, and then assigning roles to them simultaneously
- When a user's permissions are changed or their role is deleted, an email notification will be sent to inform the affected user
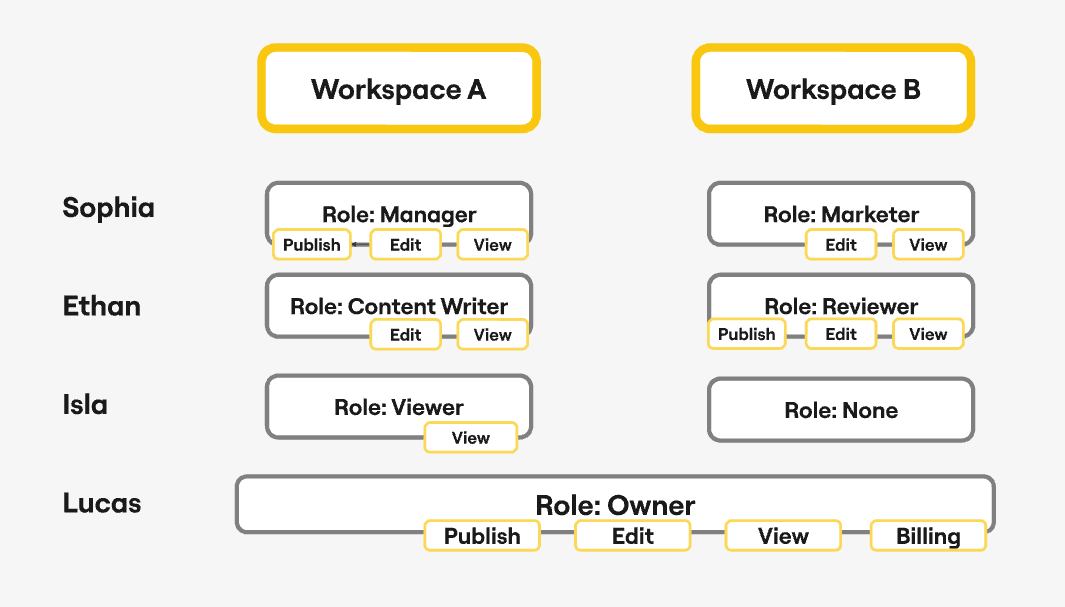
Below there’s an illustrative example of how roles and permissions are tailored across two workspaces to match each employee's responsibilities within the organization. In Workspace A, Sophia’s role as Manager gives her full control to publish, edit, and view content, reflecting her leadership position. As a Content Writer, Ethan has permission to edit and view content, supporting his focus on creation, while Isla, as a Viewer, can only observe content without making changes.
In Workspace B, roles shift according to different needs. Sophia becomes a Marketer, with permission to edit and view content in line with her focus on strategy. Ethan, now a Reviewer, has more authority, allowing him to publish and oversee content. Isla has no role in this workspace, therefore she cannot even see it, suggesting a selective approach to her involvement based on relevance.
Lucas, as the Owner, retains complete control across both workspaces, with the ability to publish, edit, view, and manage billing. His comprehensive access ensures he can oversee all areas of the organization, regardless of the workspace. This distribution of roles and permissions ensures that each person’s access aligns with their responsibilities, supporting effective collaboration while maintaining oversight.
Managing Roles and Permissions
If you are an Owner, start by navigating to Team management, to set up or edit roles. You can access this by clicking on your profile icon in the bottom left corner of your screen and selecting Team management from the menu. Other users can view roles but cannot make changes.
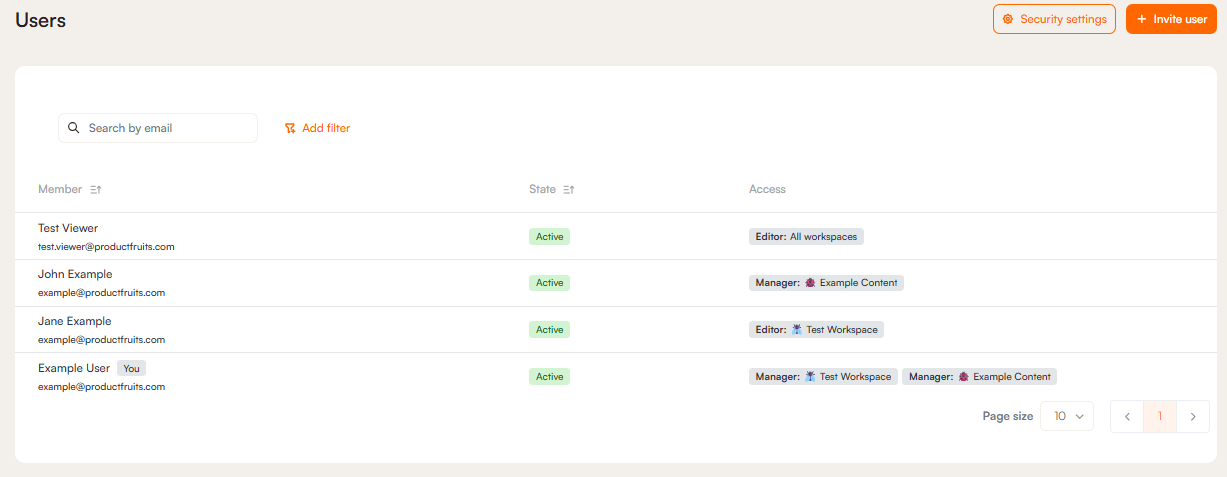
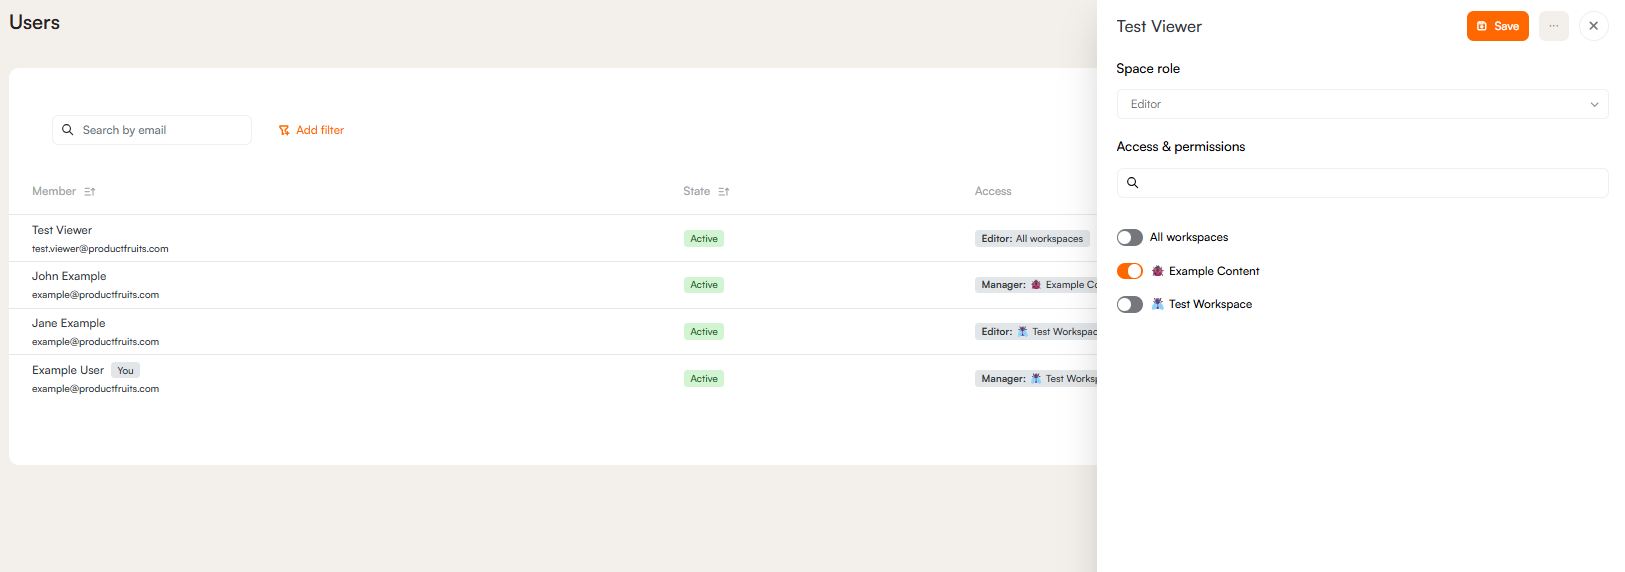
In the Members tab, you can view a list of your team members and their assigned roles within each workspace. If you are an Owner, you have the authority to edit these roles across different workspaces. To modify a user’s role, simply select the user and update their role accordingly.
To get an overview of the roles within a workspace, navigate to the Roles section. Here, you can see how many users are assigned to each role, giving you a clear picture of role distribution across your team.
