
User Identity Verification
User identity verification is a security and verification feature. It will make sure no one can impersonate other users and can also be used to only allow access to your knowledge base for users logged into your application.
It uses a server-side generated HMAC (hash-based message authentication code) on the username field, using the SHA256 algorithm.
You will generate a hash using a private key in your server-side code and pass this code to the initialization or identifyUser method. We will verify these requests on our servers. This will make sure the identified user is really the same user.
We recommend using this feature.
How to set up
Obtain a private key
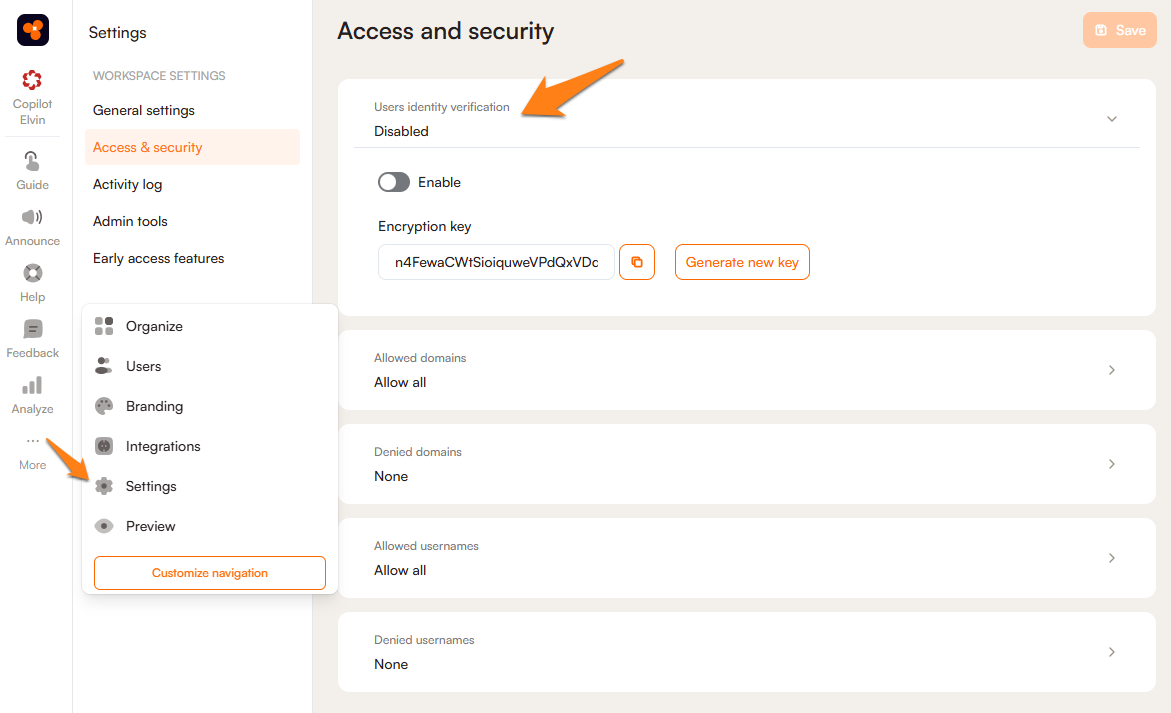
First, you have to go to the Access & Security section of your workspace settings and get the Encryption key. If you have already installed Product Fruits, do not enable the feature yet. Product Fruits will stop loading in your application if you don't finish all the necessary steps.
Use this code to create an HMAC key. Please note:
- HMAC must be generated server-side. Do not create it in your front-end code.
- Never share this key publicly!
Generate HMAC server-side
In your backend code, you will need to generate the HMAC for the given username. You should use a dedicated framework for your language for this. Typically, all major frameworks like NodeJS, .NET, Java, PHP, and others have a way to generate HMAC.
The generated HMAC should be passed to your frontend code and then to Product Fruits.
HMAC Expiration
Optionally, you can set an expiration time to the HMAC key. Without using the expiration, HMAC can protect from impersonation, but cannot disable access to the verified user. If you want to extend the protection, use the expiration feature so the HMAC key will expire after a given time. In this case, you are responsible for renewing the HMAC key before it expires.
Example
The following example uses NodeJS to generate the HMAC. You can find examples for mode backend languages here.
const crypto = require('crypto');
//// PROPS /////
var username = "testUser" // Your real user name after authentication
var secret = "SecretkeyFromWorkspaceSettings"
var expiration_minutes = 0; // if you don't want to use the expiration, you can set this to 0
////////////////
var date = new Date();
var serialisedDate = "";
if (expiration_minutes > 0) {
date.setMinutes(date.getMinutes() + expiration_minutes)
serialisedDate = date.toJSON()
}
var expirationFinalDate = date.toJSON();
var hmacData = `${username}${serialisedDate}`
var hmacHash = crypto
.createHmac("sha256", secret)
.update(hmacData)
.digest("Base64");
// get the data to your frontend code
return { hmacHash, username, expirationFinalDate }Use the generated HMAC in frontend
When you have the HMAC ready, use it during the Product Fruits snippet initialization. The following example is using the NPM package type of installation, but it works the same with all types:
import { productFruits } from 'product-fruits'

// the Product Fruits user object
const userInfoWithHMAC = {
    username: username,
    hmac: { // this is important
        hash: hmacHash, // hmacHash is the code you generated in your backend, not the private key!
        expiration: expirationFinalDate // if you use the expiration feature, pass the final datetime
    },
    props: {
    	// custom user props can be passed here
    }
};

productFruits.init('<<YOUR WORKSPACE CODE>>', '<<LANGUAGE CODE>>', userInfoWithHMAC);
FAQ