
Segmentation
When setting up content, segmentation allows you to target specific groups of users based on criteria that are important to your application. Whether you want to show content to certain users or exclude others. Let's break it down to make sure everything is clear.
Locating Information About Your Users
Before you can start segmenting content, you need to know which user properties are available to segment with. These properties depend on what data is being passed from your application to Product Fruits. You can review which properties your users consist of by checking the Tracked Users section of Product Fruits. Clicking on the detail button for a particular user will display what information is being passed to Product Fruits, and therefore what information it can segment from.
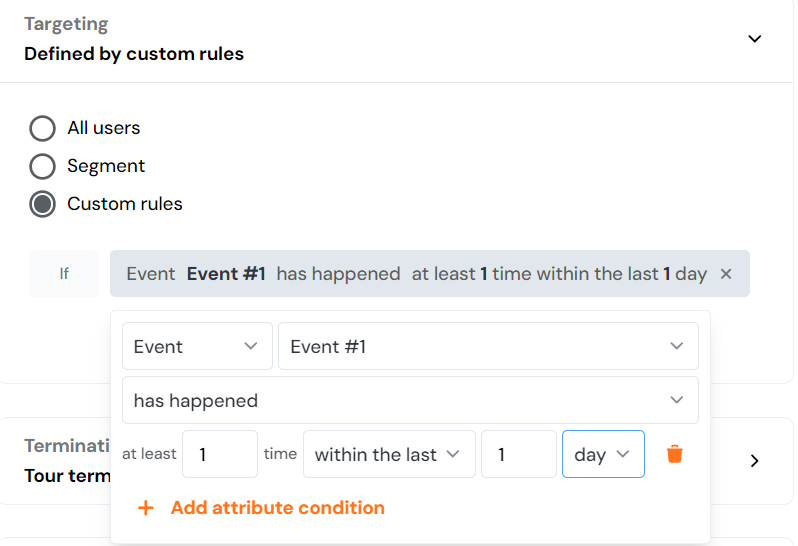
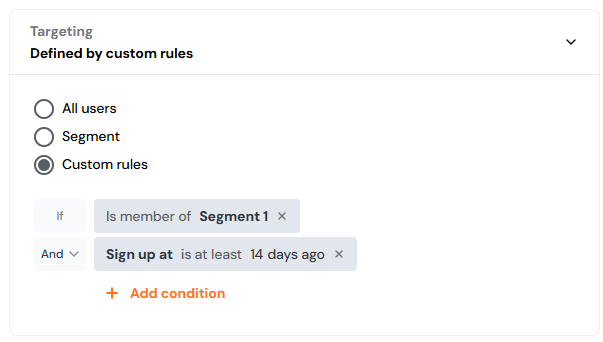
For example, the custom rule below would set the tour to begin only for users that both belong to the role admin and have finished the Tour1 tour.

If you need to add more information to your users, and for more details on how user information is sent to Product Fruits and how to set it up correctly, refer to our Identifying Users article.
Understanding the Difference Between User Segments and Targeting
There are two key ways to apply segmentation in Product Fruits: User Segments and Targeting. User Segments are reusable, while Targeting is used for one-time content assignments. For example, if you have a segment for "paid users" but only want a specific tour to target users who completed the "Orientation" tour, you would apply the segment in the targeting settings for that tour.
User Segments
These are saved collections of rules that you can create once and use across multiple pieces of content. When creating a user segment, you define conditions that match a group of users. For example, you might create a segment that targets users who have completed the Intro Tour and have been active for more than 30 days. This segment can then be applied to any future content (like tours or surveys).
Targeting
Targeting is more immediate and specific. When you create a piece of content, you can apply a segment in the Targeting menu to either include or exclude certain users. If you want to segment a single piece of content, such as a one-time tour or survey, you would use targeting rules. These rules can be based on saved segments or custom criteria like user role or signup date.
URL Filtering
URL Filtering is available in the Targeting section for some content, such as:
- Elvin widget
- Checklists
- Announcements
- Surveys
- Feedback widget
- legacy Copilot
- Life Ring Button (Legacy)
By specifying a list of URLs, you can either restrict content to display only on certain pages, or hide it from specific ones.
When configuring URL filtering, you choose one of two modes:
- Display only on these URLs: the content will be visible exclusively on the URLs you list. It will not appear anywhere else on your site.
- Hide on these URLs: the content will appear everywhere except the URLs you specify.
Many URLs contain segments that change depending on the user or context. Rather than listing every possible variation, you can use the [dynamic] placeholder to match these variable parts.
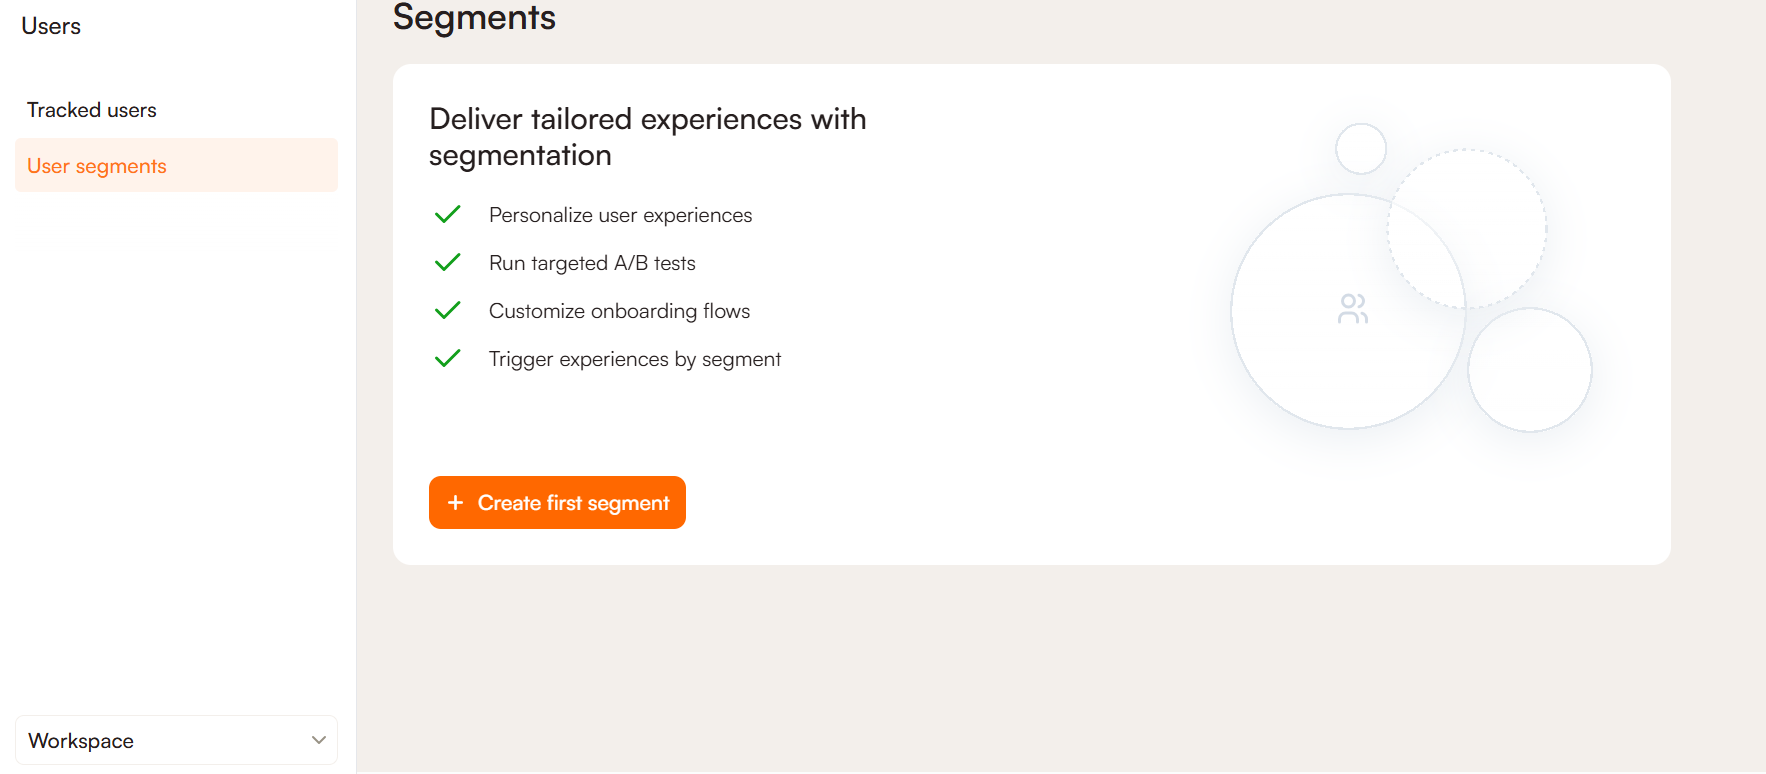
Creating Segments for Targeting
To create a user segment, go to More > End users in the Product Fruits admin panel and navigate to User Segments. Click on the Create Segment button to start adding rules.
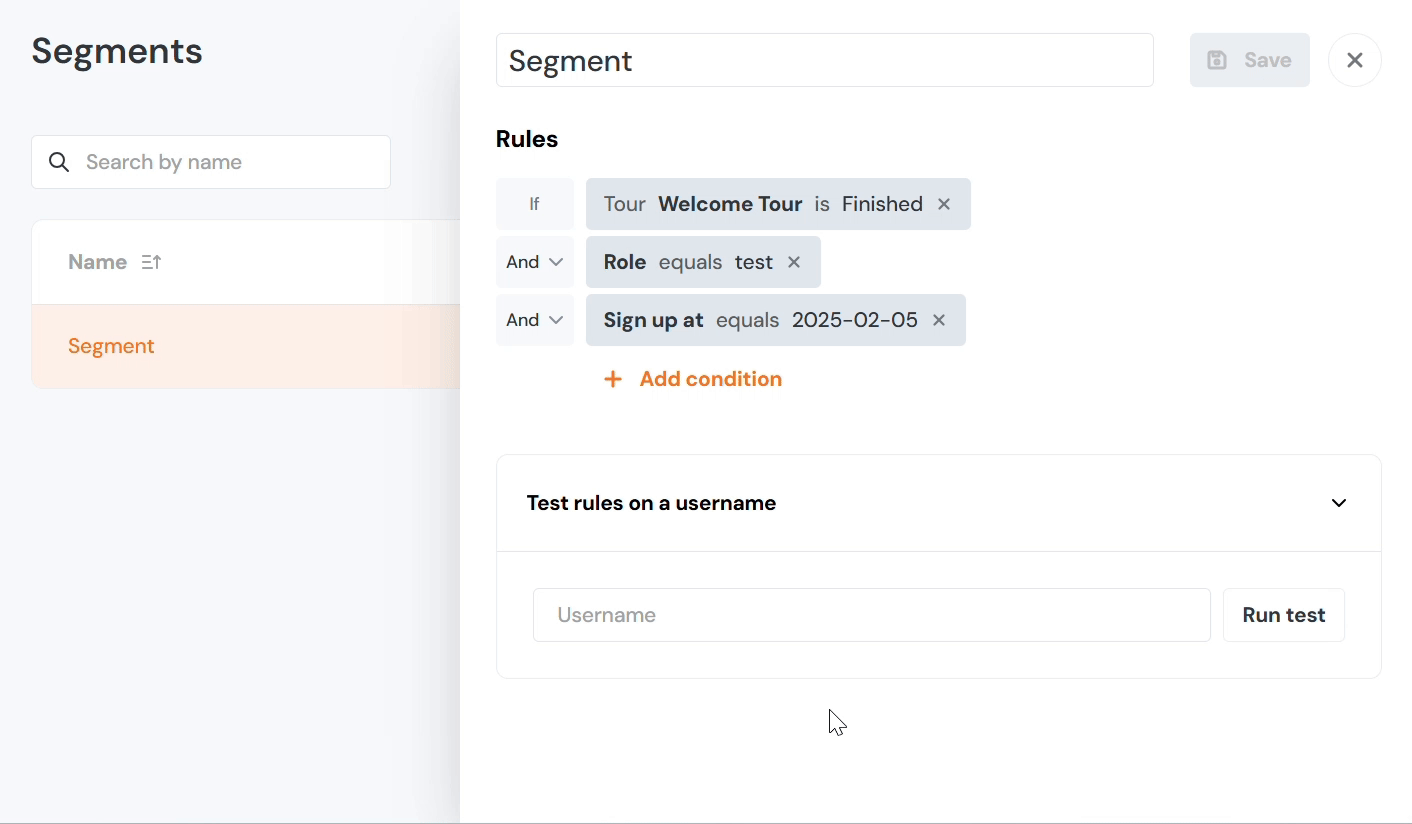
Here’s an example: Let’s say you want to show content only to users who:
- Have completed the "Welcome Tour"
- Have the role of "test"
- Signed up more than 3 days ago
Use the dropdown Add Condition to select conditions like user role, device type, or completion of previous tours. Once your segment is set up, save it and apply it wherever needed.

Segmentation by User Properties
User-based segmentation lets you target or exclude content based on attributes of the logged-in user. Below is a breakdown of each available property and the operators you can use with it.
Text Properties
The following properties all share the same set of operators, since they are all text-based fields:
- Username
- Role
- First Name
- Last Name
Available operators:
Operator | What it does |
|---|---|
Equals / Doesn't equal | Matches (or excludes) an exact value |
Is empty / Is not empty | Checks whether the field has any value at all |
Contains / Doesn't contain | Checks whether the field includes a particular phrase |
Matches regex / Doesn't match regex | Uses a regular expression pattern for advanced matching |
When to use regex: Regex operators are useful when your matching logic is too complex for a simple contains check, for example, matching emails from multiple domains at once or enforcing a specific username format.
Date Property - Sign Up At
The Sign Up At property works differently from the text fields above. It operates on a date value, so its operators are time-aware.
Fixed date operators: provide a specific date in YYYY-MM-DD format:
Operator | What it does |
|---|---|
Equals / Doesn't equal | Matches users who signed up on (or not on) an exact date |
Is empty / Is not empty | Checks whether a sign-up date has been recorded |
Is larger than | Signed up after the specified date |
Is less than | Signed up before the specified date |
Is larger than or equals | Signed up on or after the specified date |
Is less than or equals | Signed up on or before the specified date |
Relative date operators: provide a number of days instead of a fixed date. These are useful for building rules that stay current over time without needing to be manually updated:
Operator | What it does |
|---|---|
Is at least | The sign-up date was at least N days ago |
Was no more than | The sign-up date was within the last N days |
Will be in at least | The sign-up date is at least N days in the future |
Will be in no more than | The sign-up date is within the next N days |
Segmentation by Event Properties
You can also segment users based on specific events they trigger within your app. For example, you could create a segment for users who triggered the “Completed Registration” event. Additionally, you can refine this segmentation by time, such as targeting users who completed the event in the last 7 days or within a specific time frame.
Event-based segmentation is powerful because it allows you to create segments based on user actions, not just static properties.
Testing Rules on a Specific User
Sometimes you need to test if a segment will actually match a specific user. To do this, simply use the Test Rules on a Username feature within the segment settings. This allows you to simulate the segment’s rules on a given user and see if the conditions are met.
If the segment uses AND operators, all conditions must match, but if you're using OR, only one condition needs to match. If you’re testing a segment with content interactions (like a tour or survey), check Tracked Users for that user instead.
Combining AND/OR Rules in Segmentation
You can combine AND and OR operators within your segmentation rules. This lets you get very specific about who sees your content.
- AND: All conditions must be true for the content to be shown.
- OR: Only one condition needs to be true.
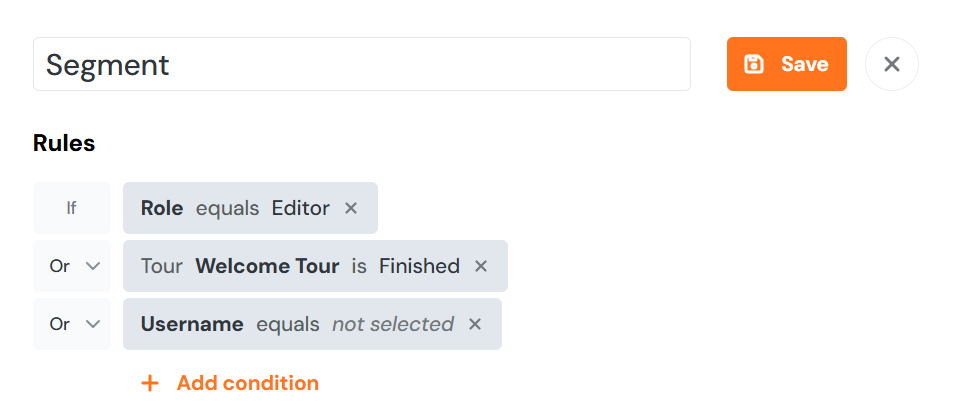
For example, you might create a segment to target users whose role is Editor and who have completed the "Welcome Tour" OR have been on the platform for at least 30 days. This flexibility allows you to create nuanced targeting rules to fit your audience.
To combine AND + OR rules in segmentation you will need to combine segments or segments and custom rules.
You can combine them in this way by using two segments and applying both to a piece of content:
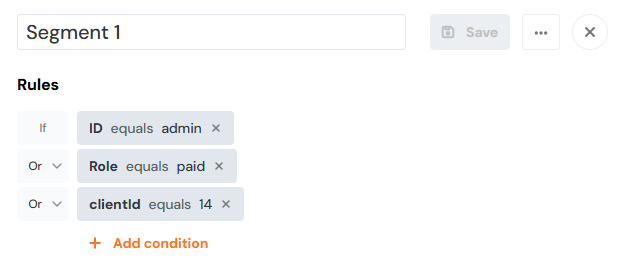
The first segment contains a series of conditions, of which only one needs to be true.
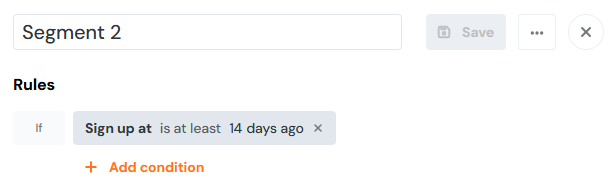
By combining the segments, you specify that the conditions within each segment must be met: whether a segment contains only one condition or multiple OR conditions (in the newly combined segment, at least one of these conditions must be true).
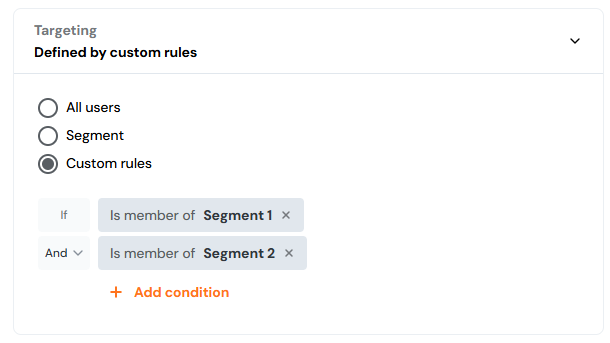
You can also combine a segment with a custom rule:
Adding Segments to Content
Once you’ve created your segments, you can apply them to Product Fruits content directly from the Targeting menu. Here, you can either include or exclude the segment from specific tours, hints, or surveys. If you want to make sure your content is only shown to a specific group, this is where you’ll apply your saved segments or custom rules.