Flows Overview
Flows let you build multi-step guided experiences that run inside your web product. A flow is a sequence of steps — cards, conditions, actions, and messages — that walk users through a process: onboarding, feature adoption, activation, or communicating a product change.
Unlike a static tour, a flow can react to what the user does. It can wait for a condition to be met, branch into different paths, and only advance when the user completes the expected action.
Plan Availability
Legacy / Custom Plans
One Flow
Supported step types: Card
Starter
15 Flows
Supported step types: Card
Pro
100 Flows
Supported step types: All features except: Email block, Slack block, AI Classifier, AI Transform
Business
Unlimited Flows
Supported step types: All Features
Limitations
All Plans:
- 40 steps per flow canvas
- 150 executed steps per user enrollment (flows terminate after this to prevent infinite loops)
- 50 flow variables
Lifecycle of a Flow
- Create a flow from scratch or with Elvin's help.
- Define how the flow starts and who is eligible to see it.
- Build the flow on a canvas by adding steps and connecting them in sequence.
- Edit each step in detail, including content, buttons, styling, and media.
- Preview the flow on top of your real product UI.
- Publish the flow and optionally schedule when it should be active.
- Eligible users see the flow inside your product when its start conditions are met.
- If the content of the flow is changed, you need to take a snapshot, so previous versions can be accessed.
- Make sure to save and publish the changes.
- You need to restart the flow for users who have previously seen it if you want to show them the updated flow.
How to Create a Flow
Go to Engage > Flows and click Create Flow. There are two ways to start:
Record with Elvin
Opens the editor alongside a recording toolbar in your product. You navigate to the pages you want to include, click on UI elements to add them as steps, and Elvin generates card content based on the page and any context you provide. You can edit everything afterwards.
The recording toolbar has four controls:
- Mouse icon: navigate freely without recording. Clicks won't be captured as steps, so you can move around your product to get to the right page without affecting the flow.
- Add step: click UI elements to add them as sequential steps. A numbered badge appears on each selected element showing its position in the flow. Hover over a step to remove it or to add context for Elvin about what that step should explain.
- Select and go: click a link to navigate to it. Use this when you need to follow a link to reach the next part of your flow.
- Enable Elvin generator: when toggled on, Elvin reads the selected elements and the page content to generate card copy. When toggled off, clicking elements still adds them as steps, but the cards will be empty and you'll write the content yourself.
Start from Scratch
Start from scratch opens an empty canvas, and you have to create each step manually.
It is also possible to migrate an existing tour. At the first step of the creation process, select Migrate existing tour, pick the tour from the list, and click Migrate to flow. The content transfers over, but you may need to adjust styling using themes.
Flow Editor
Once you're in the editor, the canvas is where you build and manage the structure of your flow.
Name
Click the name field at the top to rename the flow. This is internal, for you and your team, your end-users never see it. Use something descriptive enough that you and your teammates can understand what the flow does at a glance without opening it.
Theme
Select a theme to control the visual appearance of all cards in the flow. You can override the style on individual cards as well. Theme changes are saved globally, updating a theme affects any other flow using it, and the saved theme becomes the default for new flows. Learn more about themes.
Translate
Localize the flow into any language your application supports. Each translation counts toward the translation limit included in your plan. You can check your current usage in your account settings.
Tag
Attach a descriptive tag to the flow. Tags make it easier to search and filter your flows list as it grows.
Preview
As you make changes in the editor, the preview updates in real time so you can see exactly how the flow will appear to users.
Drag and select / Plus icon
Use the plus icon to add a new step to the canvas. Drag it to connect it to the appropriate position in the flow sequence.
Note
Additional explanation added for you or your team mates.
Minimap
When a flow has many branches and steps, the minimap gives you a zoomed-out overview of the full structure so you can navigate without losing track of where you are.
Version history
A log of every published version of the flow, showing who published it and when. You can preview any historical version to see how it looked, and restore it if needed.
Fit View
The Fit View button zooms in on a single selected step and enlarges it to fill the canvas.
Fullscreen
The Fullscreen button switches the editor into full-screen mode. When active, the Product Fruits sidebar and surrounding navigation disappear, and the flow editor expands to fill the entire screen.
Flow Settings
Start
This is where you configure what triggers the flow and who it's shown to.

Trigger
- Once per user: the flow runs a single time per user. Once they've completed or exited it, it won't appear again.
- Manually triggered: the flow doesn't start automatically. Instead, it's launched by calling the Product Fruits JavaScript API from your own code, for example, from a button click, a custom event, or any logic in your application.
- When other flow state: starts this flow automatically based on what happened in a different flow. You select the other flow and define the condition: whether it was finished, skipped/dismissed, or either. This lets you chain flows together or create follow-up sequences.
- On event: The flow will start when the selected event occurs.
The Public ID field in this section shows the unique identifier you need to pass to the JS API to launch this specific flow.
Who Will See It
Controls which users are eligible to enter the flow. You can target:
All users: the flow is shown to everyone
Segment: Restricts the flow to a predefined user segment. Open the selector to search your existing segments or create a new one inline.
To verify your targeting is working as expected, you can test it directly from this panel. Under the Users tab you can see the eligible users of the selected segment. To test a specific user, click Run test and enter a username.
The test will show the rule definition and whether the entered username is Matched or not. A few things to keep in mind:
- If the username is not tracked in Product Fruits, it will not be found
- If the flow has unsaved changes, you need to save it first before running the test
Custom rules: define eligibility using a combination of user properties and events
URL filtering: display or hide on specifc URLs. Use the [dynamic] keyword to replace the dynamic parts of your URL.
Admin Tools
Lets you restart the flow for a specific user or for all users at once. Restarting resets the flow as if the user has never seen it. It doesn't reset the analytics.
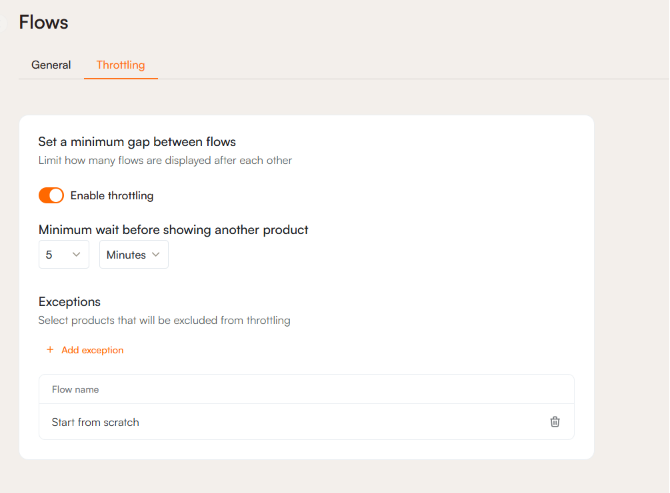
Throttling
If a user qualifies for multiple flows at once, throttling controls how quickly they're shown one after another. Without it, a user could be enrolled in several flows back to back, which tends to feel disruptive.
To enable throttling, turn on the toggle and define the minimum gap between flows. You can set this in minutes, hours, or days depending on how much breathing room you want between experiences.
Exceptions let you exclude specific flows from throttling rules. A flow added as an exception will trigger regardless of the gap, even if another flow was just shown. Use this for high-priority flows that should never be held back: a critical onboarding step or an urgent product change, for example.