
Customer.io Flow Step
The Customer.io step sends an event, updates a person’s attributes, or adds a person to a manual segment while a user is going through a flow. Use it when what someone does in your product should drive what they receive from Customer.io. It runs on Product Fruits’ servers, so the end user sees nothing while it happens.

The Customer.io Flow step is available only on the Business plan. This feature is currently in Early Access. Its functionality may change, and you may encounter occasional issues while using it.
Set Up the Connection
Only Product Fruits workspace Owners can create or edit connections. Anyone who can edit a Flow can select an existing connection by name, but they cannot see its API token.
Create a Track API Key in Customer.io
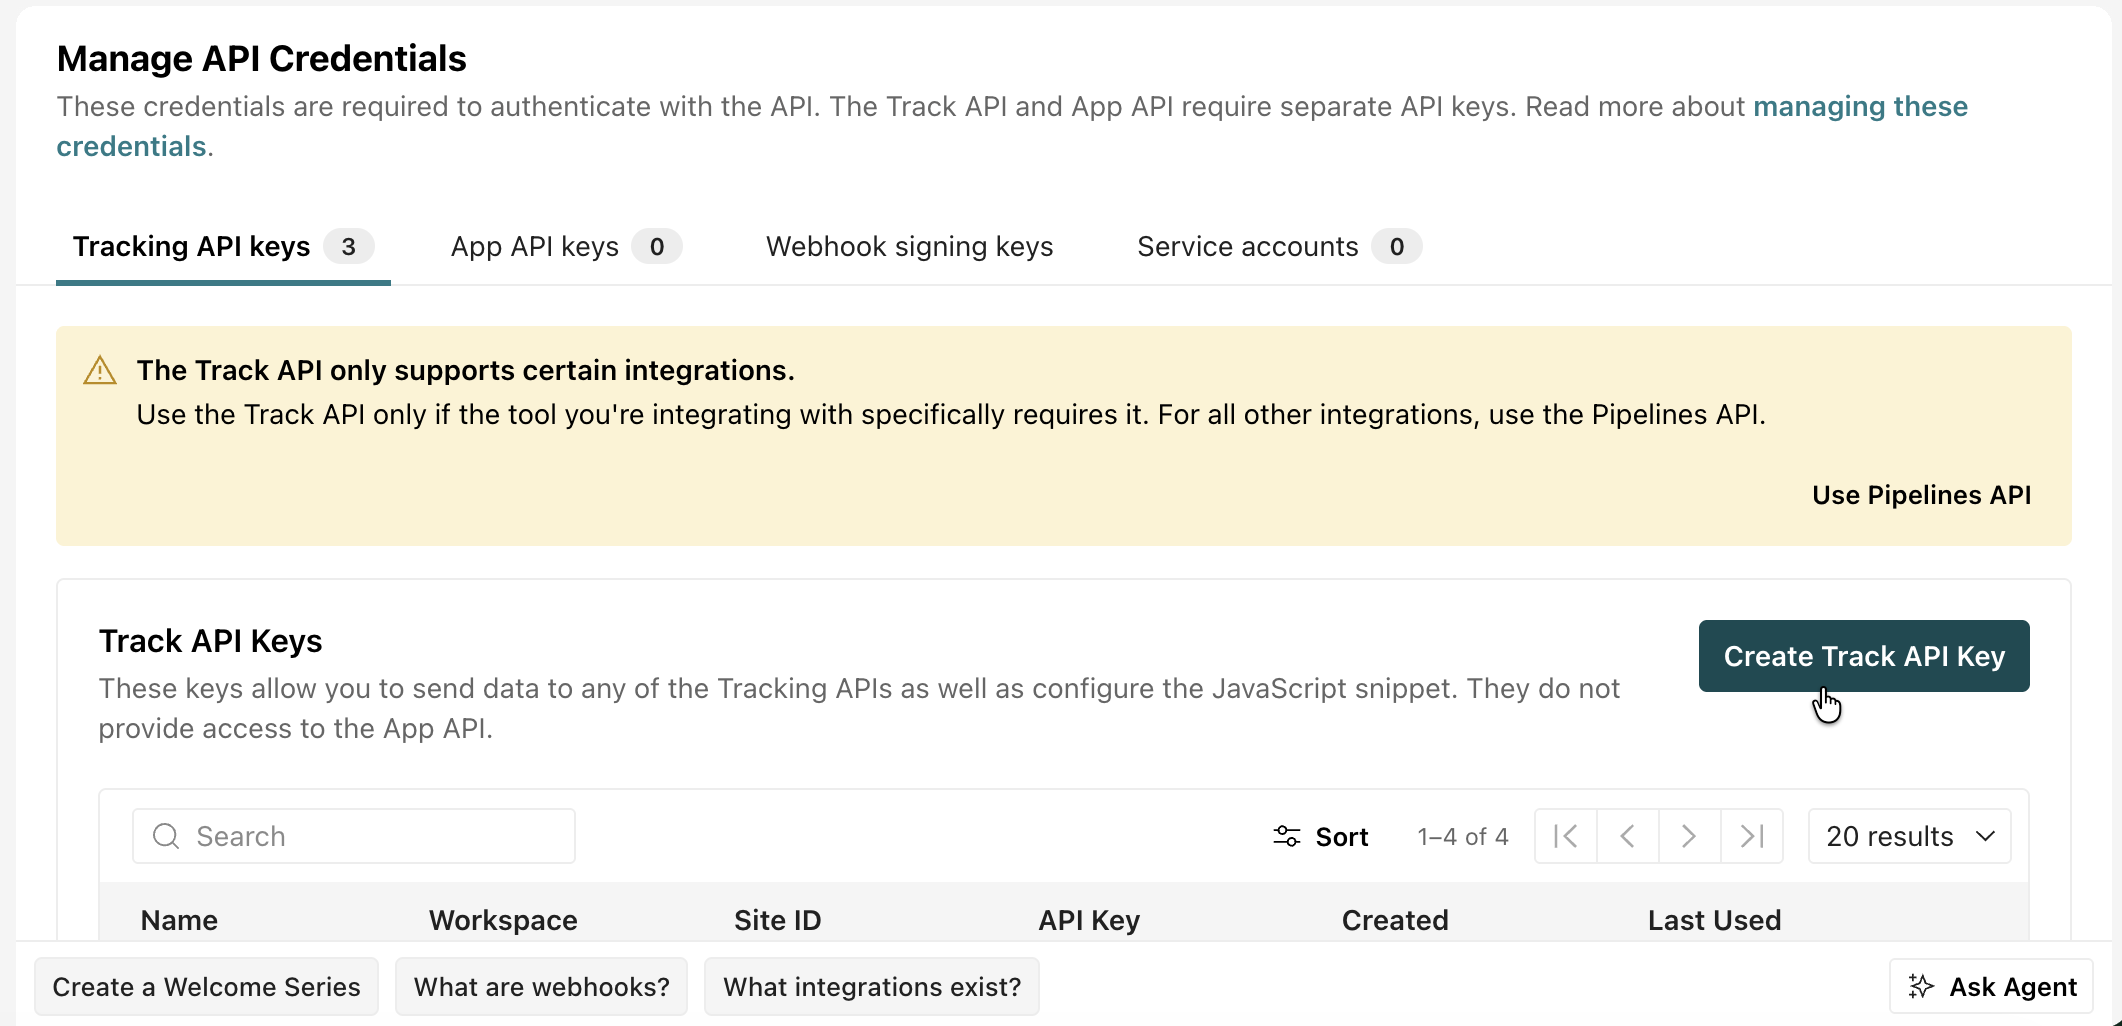
- Open your Customer.io profile and navigate to Workspace Settings, and under the Advanced section click on API and webhook credentials
- You will need the Tracking API keys, not app API keys
- Click on Create Track API Key, and give it a descripitive name
- Click on track api key and copy your Site ID
Create the Customer.io Connection in Product Fruits
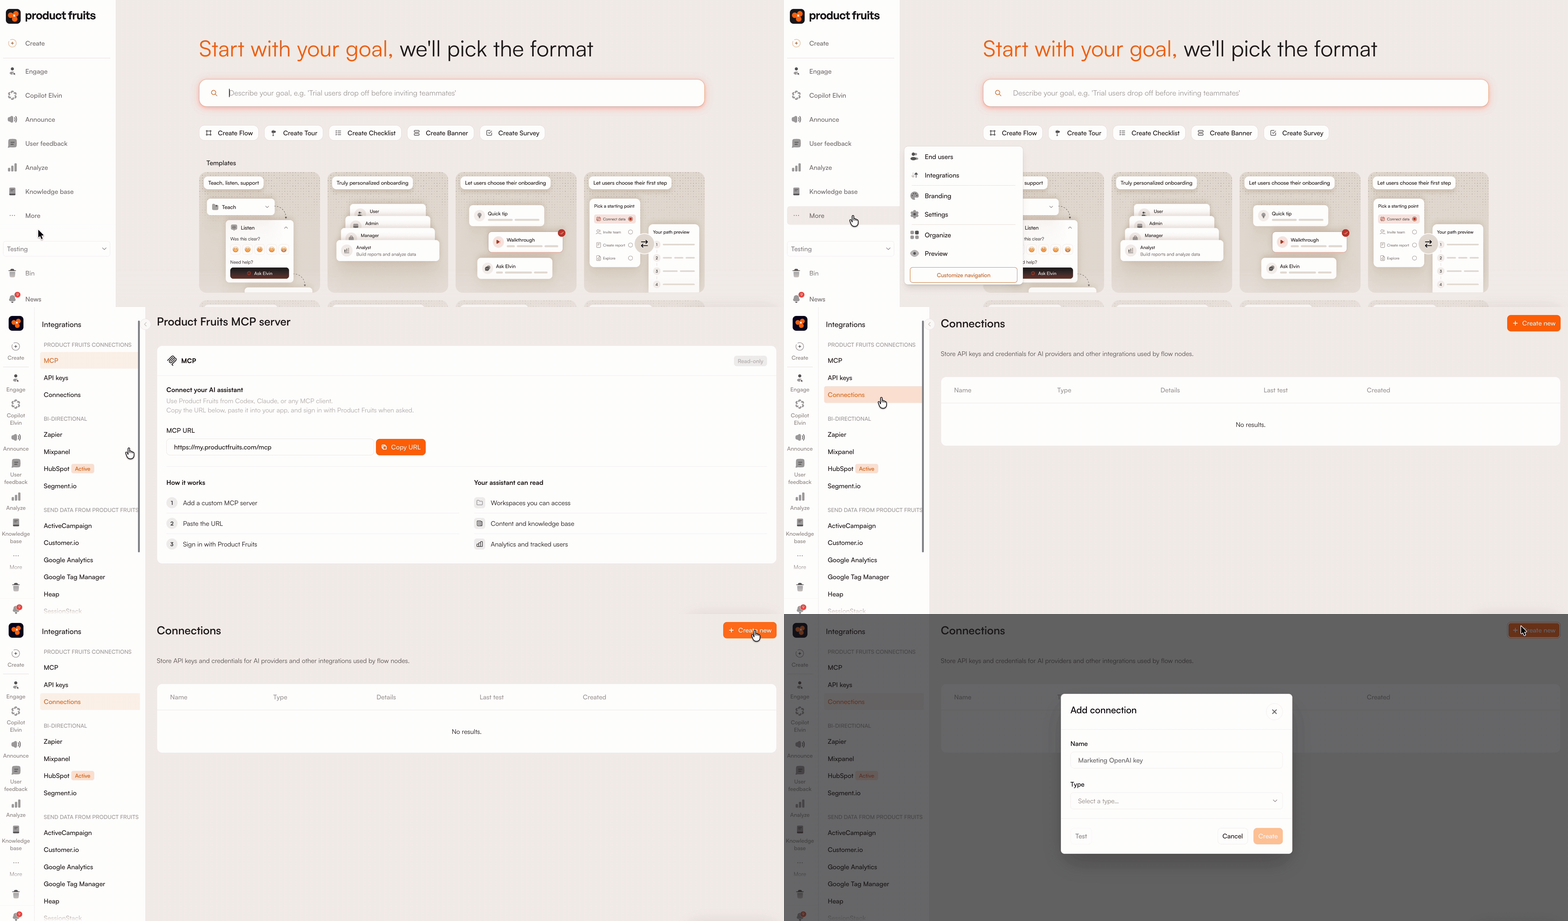
- In Product Fruits, go to More → Integrations → Connections and click Create new.
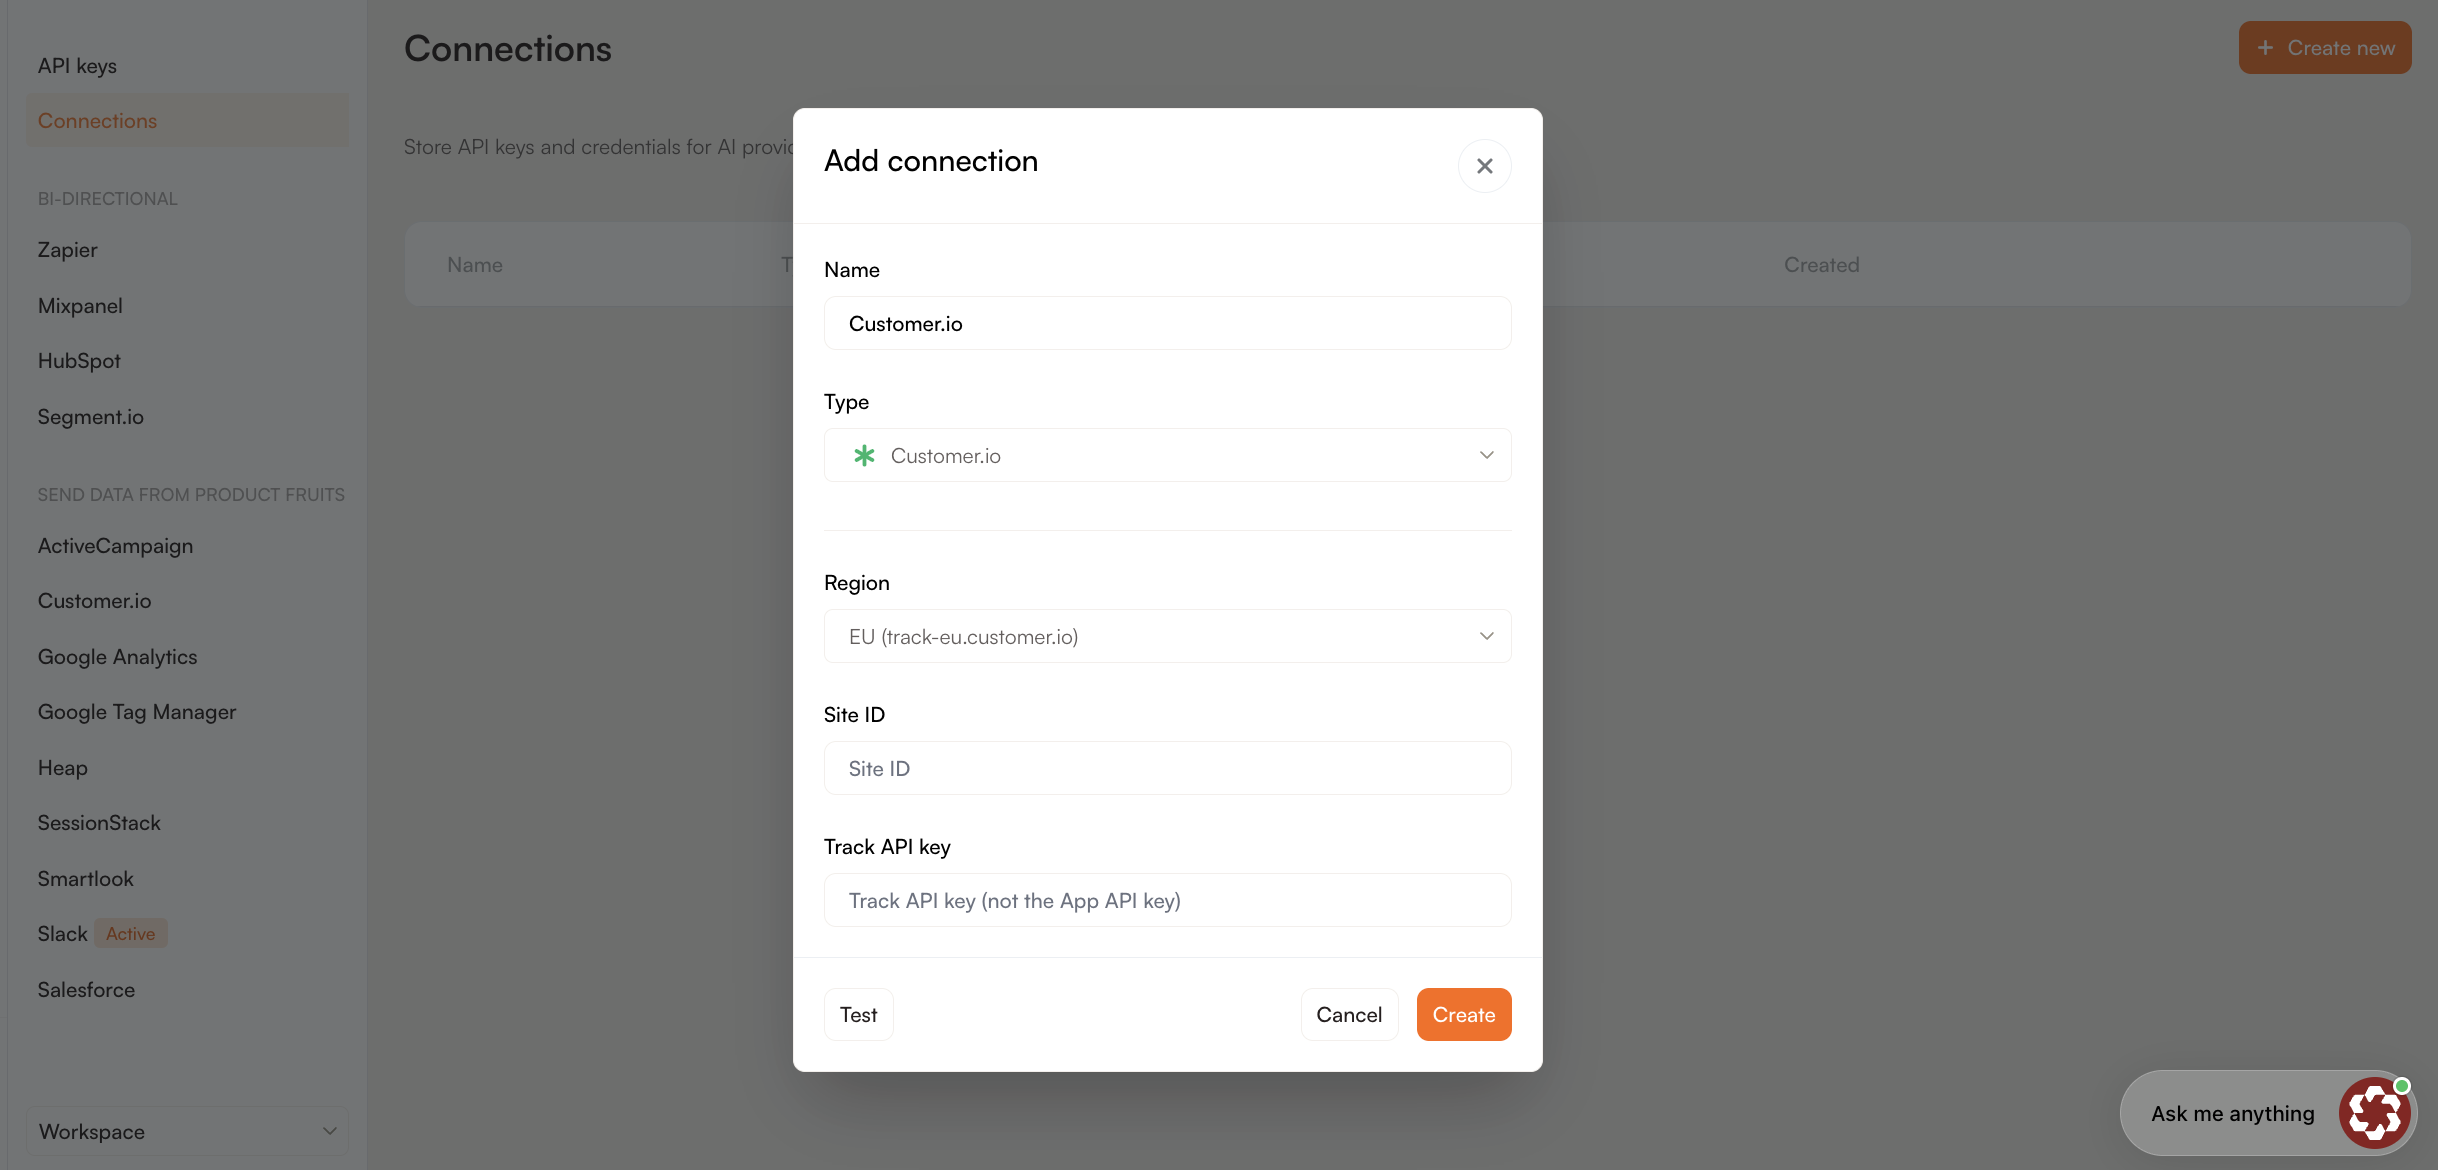
- Enter a descriptive connection name and select Customer.io as the connection type.
- Pick the Region of your Customer.io account — US (track.customer.io) or EU (track-eu.customer.io).
- Paste both values in: SiteID and the Track API key. It must be the Track API key — the App API key does not work here.
Configure the Customer.io Flow Step
- In the Flow editor, add the Customer.io step from the Advanced (Pro) section and click Edit.
- Select the Customer.io connection the step should use. Workspace Owners can also create a new connection directly from the step.
Choose What the Step Does
Under Who and what, select an Action:
- Send event (triggers campaigns): Send an event that can trigger a campaign in Customer.io.
- Update person attributes: Add or update information stored on a person in Customer.io.
- Add to manual segment: Add a person to an existing manual segment.
The remaining fields change according to the selected action.
Identify the Person
Under Identify person by, select how Customer.io should find the person:
- Email: Find the person using their email address.
- Person ID: Find the person using their Customer.io Person ID.
Next, choose where Product Fruits should get the person’s email or ID:
- Enrollment variable: Select a variable stored in the current Flow enrollment.
- User property: Select one of the user’s Product Fruits properties.
- Fixed value: Enter the email address or Person ID directly. You must enter a value when selecting this option.
The resolved value must match the email address or Person ID associated with the person in Customer.io.
Send an Event
Select Send event (triggers campaigns) to send an event for the identified person.
Enter the Event name that Customer.io should receive. Campaign triggers in Customer.io must match the resolved event name.
Event data is optional. To include additional information with the event, click Add event data and enter a Name and Value. You can add multiple event data items.
Update Person Attributes
Select Update person attributes to add or update information stored on the identified person.
At least one attribute is required. Enter the Customer.io attribute Name and the Value that should be stored. Click Add attribute to update additional attributes.
Add the Person to a Manual Segment
Select Add to manual segment and enter the Manual segment ID. You can find this ID in the segment’s URL in Customer.io.
Only manual segments are supported.
Use Placeholders
The Event name, event data Value, and attribute Value fields support placeholders. Use them to include user information or values collected earlier in the Flow.
See Using placeholders for the supported values and instructions on adding fallback text when a value is unavailable.
Handle Failed Issue Creation
Enable Failure branch and connect it to another step if you want the Flow to follow an alternative path when the Customer.io issue cannot be created.
If issue creation fails, the Flow follows the connected failure branch instead of stopping.
Debug the Customer.io Step
Use the Customer.io step’s debug logs when an issue is not created as expected or when the Flow follows the failure branch.
Select a run to open its details. The information at the top identifies the specific Customer.io step execution:
- Action: The name assigned to the Customer.io step.
- When: The date and time the step ran.
- User: The Product Fruits username associated with the Flow execution.
- Enrollment: The identifier of the user’s enrollment in the Flow.
- Run: The identifier of this particular step execution.
- Connection: The identifier of the Customer.io connection used to send the request.
Use the copy icon beside the Enrollment or Run identifier when you need to share it with Product Fruits support.
Request and Response
The Request panel shows the request method and the Customer.io endpoint to which it was sent. The Response panel shows the response code and how long Customer.io took to respond. For example, a 201 response means that Customer.io created the issue successfully.
Request and response headers and bodies are not stored for successful executions.
Find and Filter Runs
Use Search by username to find executions associated with a particular user.
Use the Status filter to narrow the list by the overall outcome:
| Status | What it shows |
|---|---|
All | Every execution, regardless of its outcome |
Success | Executions where the Customer.io issue was created successfully |
Failed | Executions that did not create a Customer.io issue because an error occurred |
Skipped | Executions where Product Fruits did not send a request to Customer.io |
To investigate unsuccessful executions, click Add filter → Error type.
Error type | What it means |
|---|---|
All | Every error type |
Configuration | A required setting is missing or invalid, or a required placeholder did not resolve correctly |
Rejected by provider | Customer.io received the request but rejected its contents |
Authentication failed | Customer.io could not authenticate the connected account; the API token may be incorrect, expired, or revoked |
Permission denied | The connected Atlassian account does not have permission to perform the requested action |
Not found | Customer.io could not find the selected project, issue type, or another required resource |
Rate limited | Customer.io temporarily rejected the request because too many requests were sent |
Send limit reached | Product Fruits reached its sending limit and did not send the issue |
Provider unavailable | Customer.io was temporarily unavailable |
Unexpected error | The execution failed for a reason that does not match another category |
You can combine filters. For example, select Failed under Status and Permission denied under Error type to show only failures caused by insufficient Customer.io permissions.
Select the refresh icon in the upper-right corner to load the latest executions.
Limitations
- Add to manual segment works only with manual segments in Customer.io, not with data-driven ones.
- Manual segment ID takes a plain number. Placeholders are not resolved in that field.
- Values are sent as text. If you need a number or a date for segmentation, set the attribute’s type in Customer.io.
 Need more help? Book a demo with our team of experts.