
Jira Flow Step
The Jira Flow step creates an issue in your Jira Cloud project from data the flow already holds. Use it when feedback, a bug report or a request captured in a Flow should reach your team’s backlog without anyone re-typing it. It runs on Product Fruits’ servers, so the end-user sees nothing while it happens.

The Jira Flow step is available only on the Business plan. This feature is currently in Early Access. Its functionality may change, and you may encounter occasional issues while using it.
Set Up the Connection
Only Product Fruits workspace Owners can create or edit connections. Anyone who can edit a Flow can select an existing connection by name, but they cannot see its API token.
Every Jira issue created by the Flow is filed by the Atlassian account connected to Product Fruits. This account must have permission to create issues in the Jira projects you intend to use. Projects where the account cannot create issues will not appear in the project picker.
Create an API Token in Atlassian
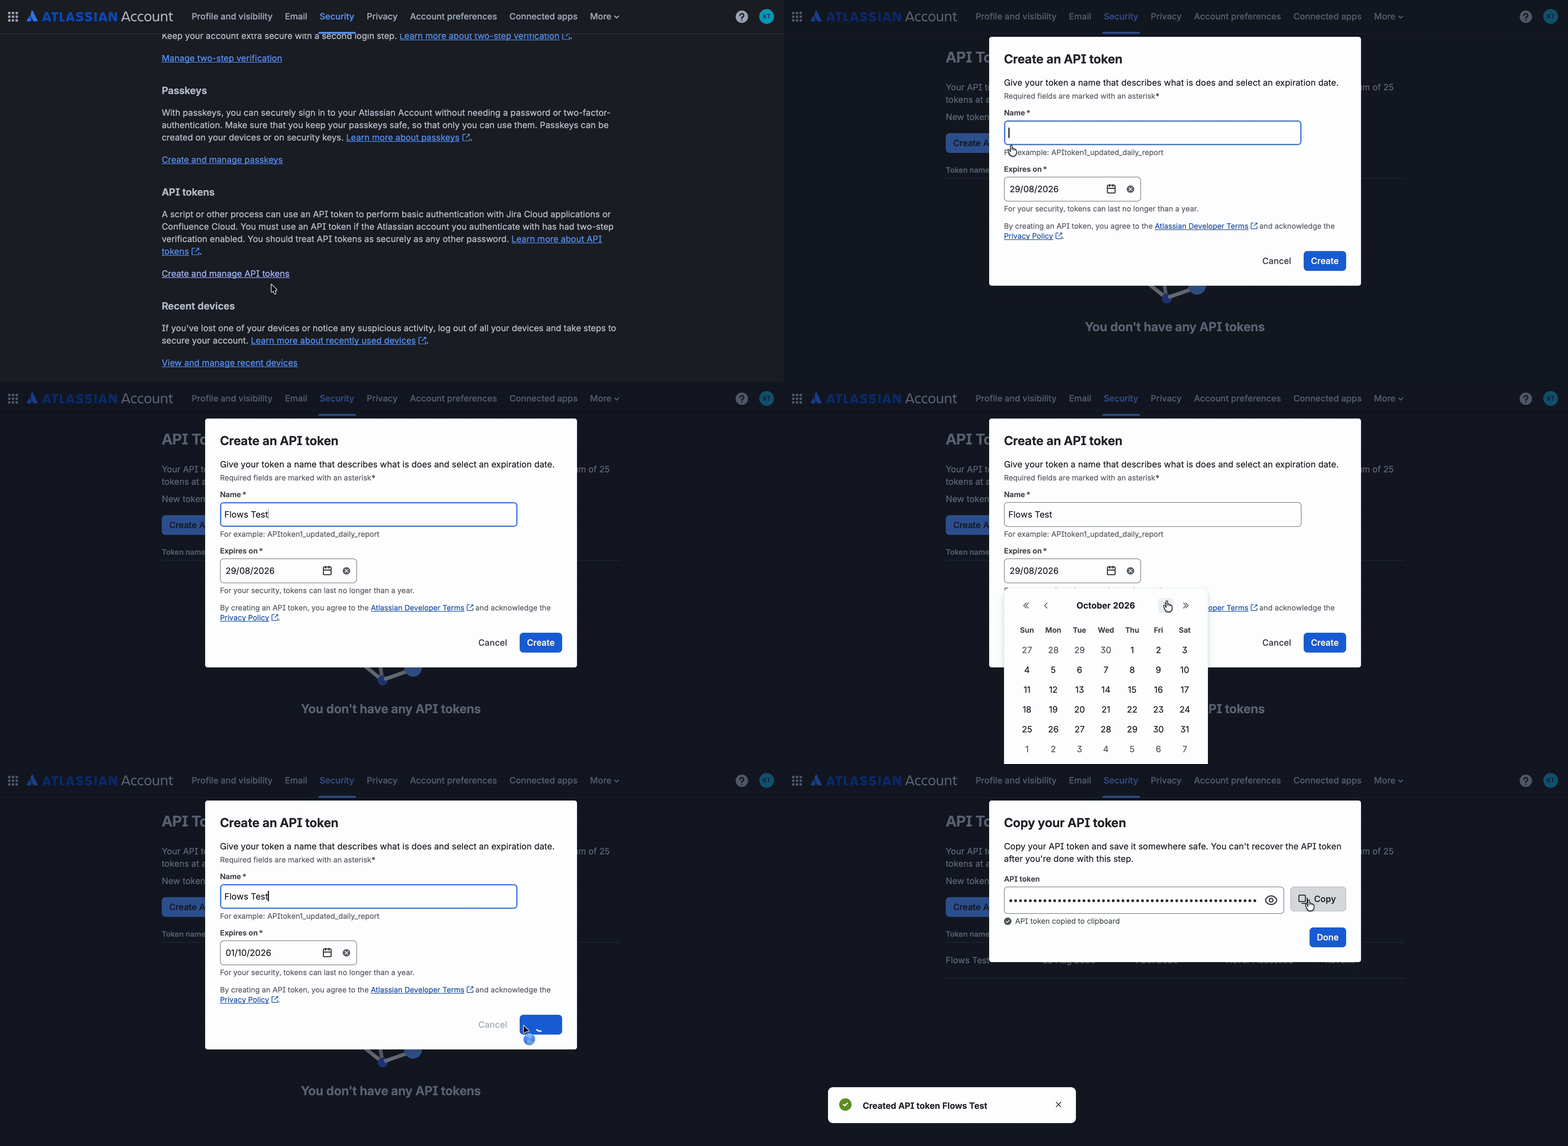
- Open your Atlassian profile and go to Account settings → Security.
- Under API tokens, select Create and manage API tokens.
- Click Create API token.
- Enter a descriptive name, such as
Product Fruits Jira connection. - Select an expiration date. The default expiration period is one week, but we recommend selecting a longer period, if your organization allows it, so the connection does not expire unexpectedly.
- Click Create.
- Copy and securely save the API token. Atlassian displays the token only once.
Create the Jira Connection in Product Fruits
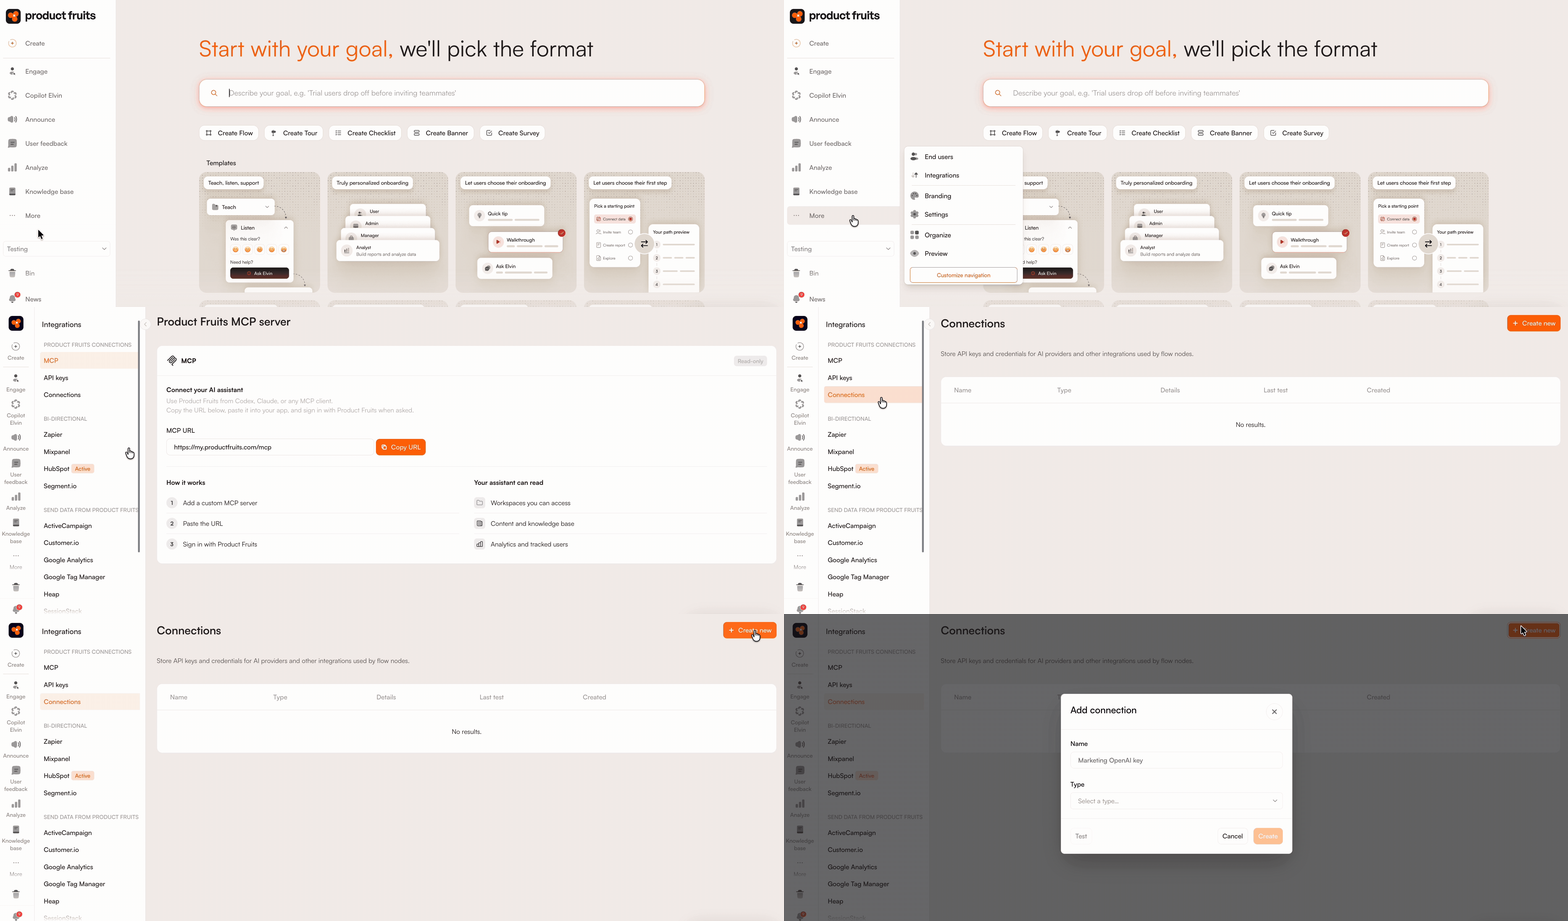
- In Product Fruits, go to More → Integrations → Connections and click Create new.
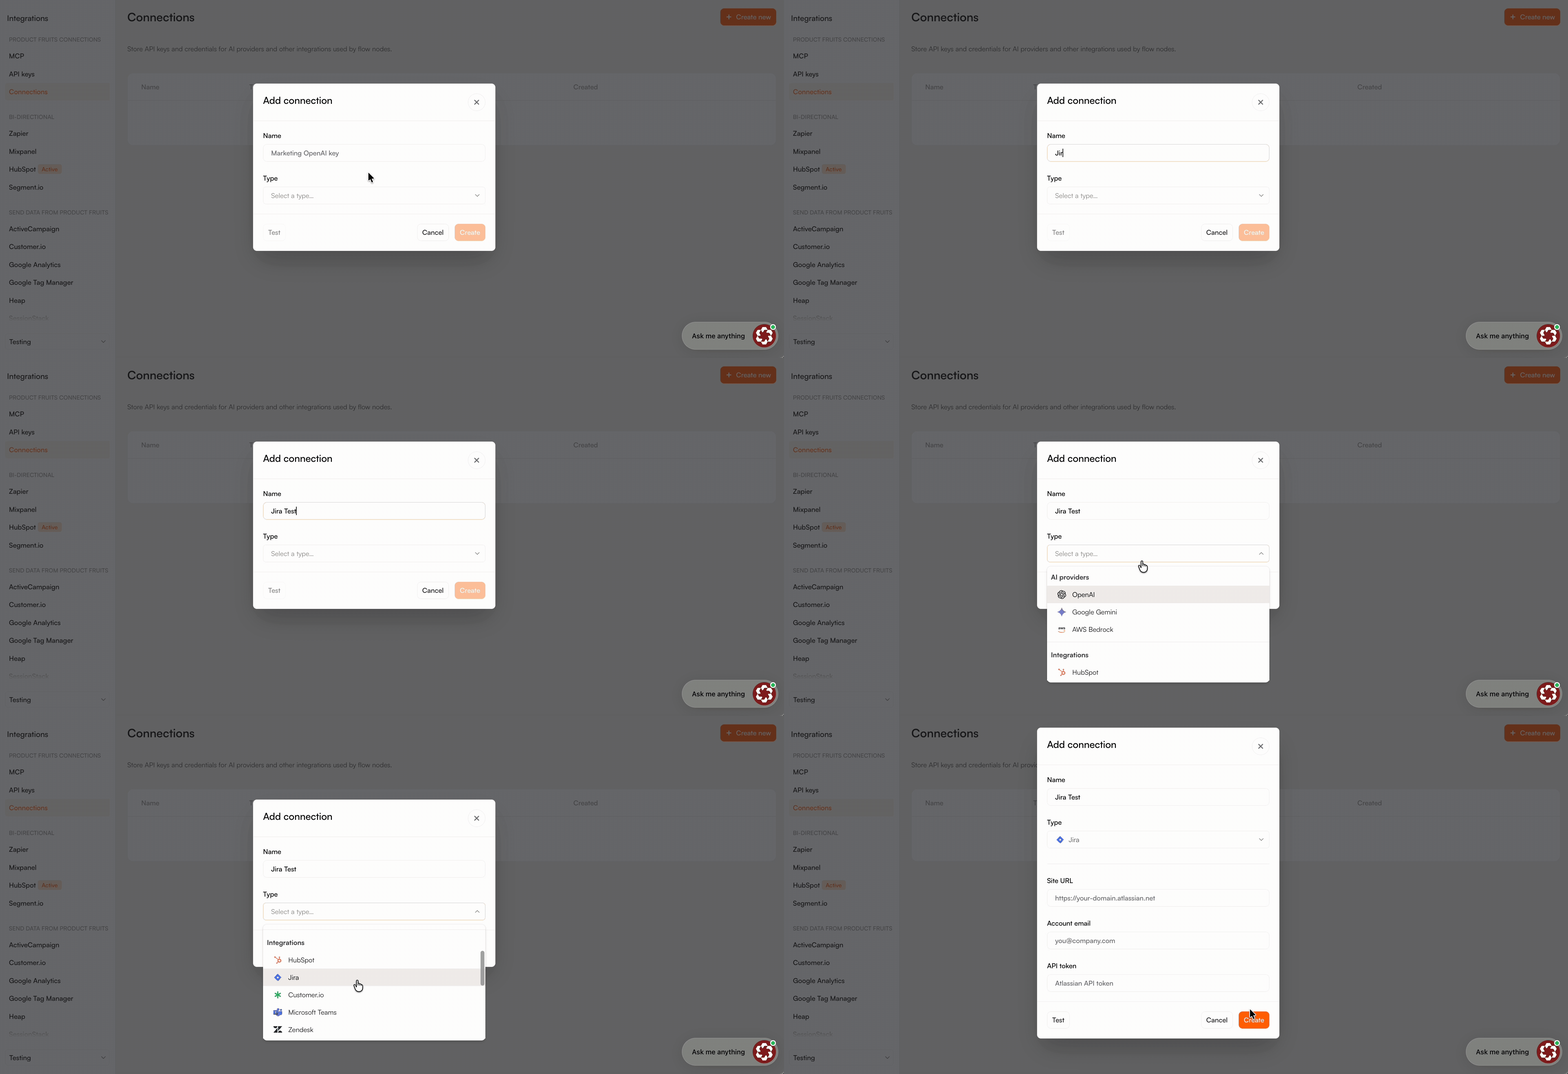
- Enter a descriptive connection name and select Jira as the connection type.
- Enter your Atlassian site URL, for example
https://your-domain.atlassian.net. - Enter the email address of the Atlassian account that generated the API token.
- Paste the API token you copied from Atlassian. When editing the connection later, leave this field blank to keep the stored token.
- Click Test to verify the credentials. If the test succeeds, click Create.
Configure the Jira Flow Step
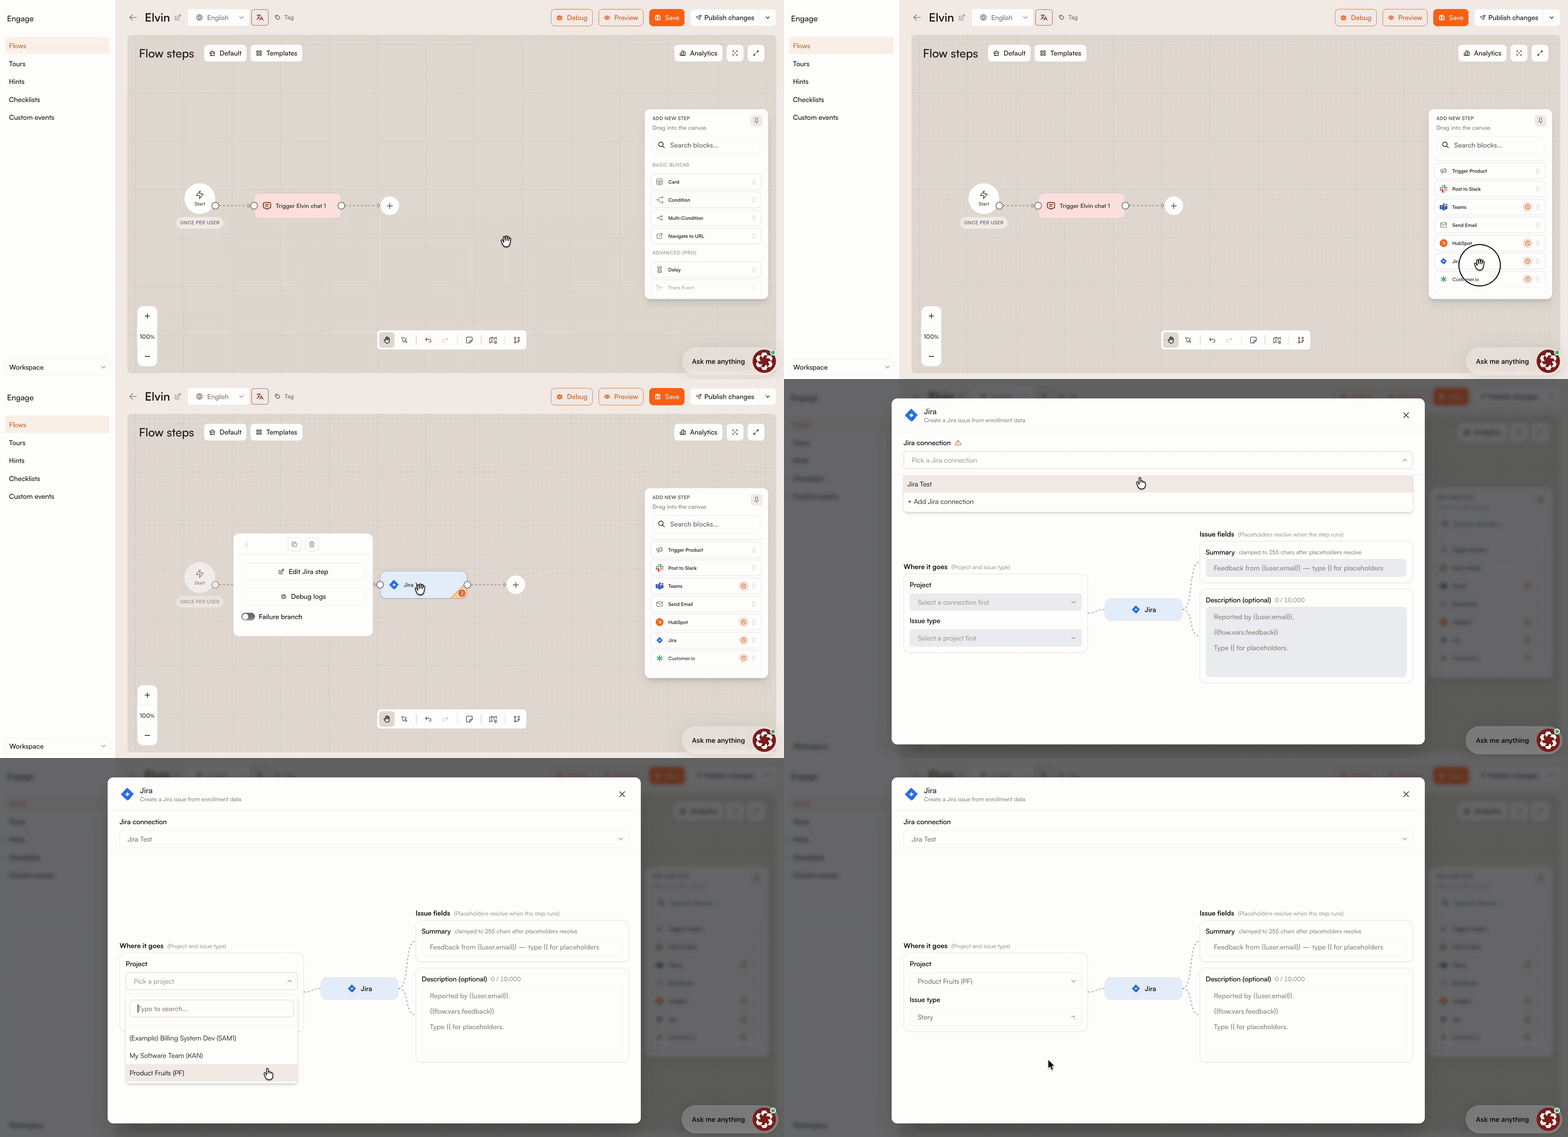
- In the Flow editor, add the Jira step from the Advanced (Pro) section and click Edit.
- Select the Jira connection the step should use. Workspace Owners can also create a new connection directly from the step.
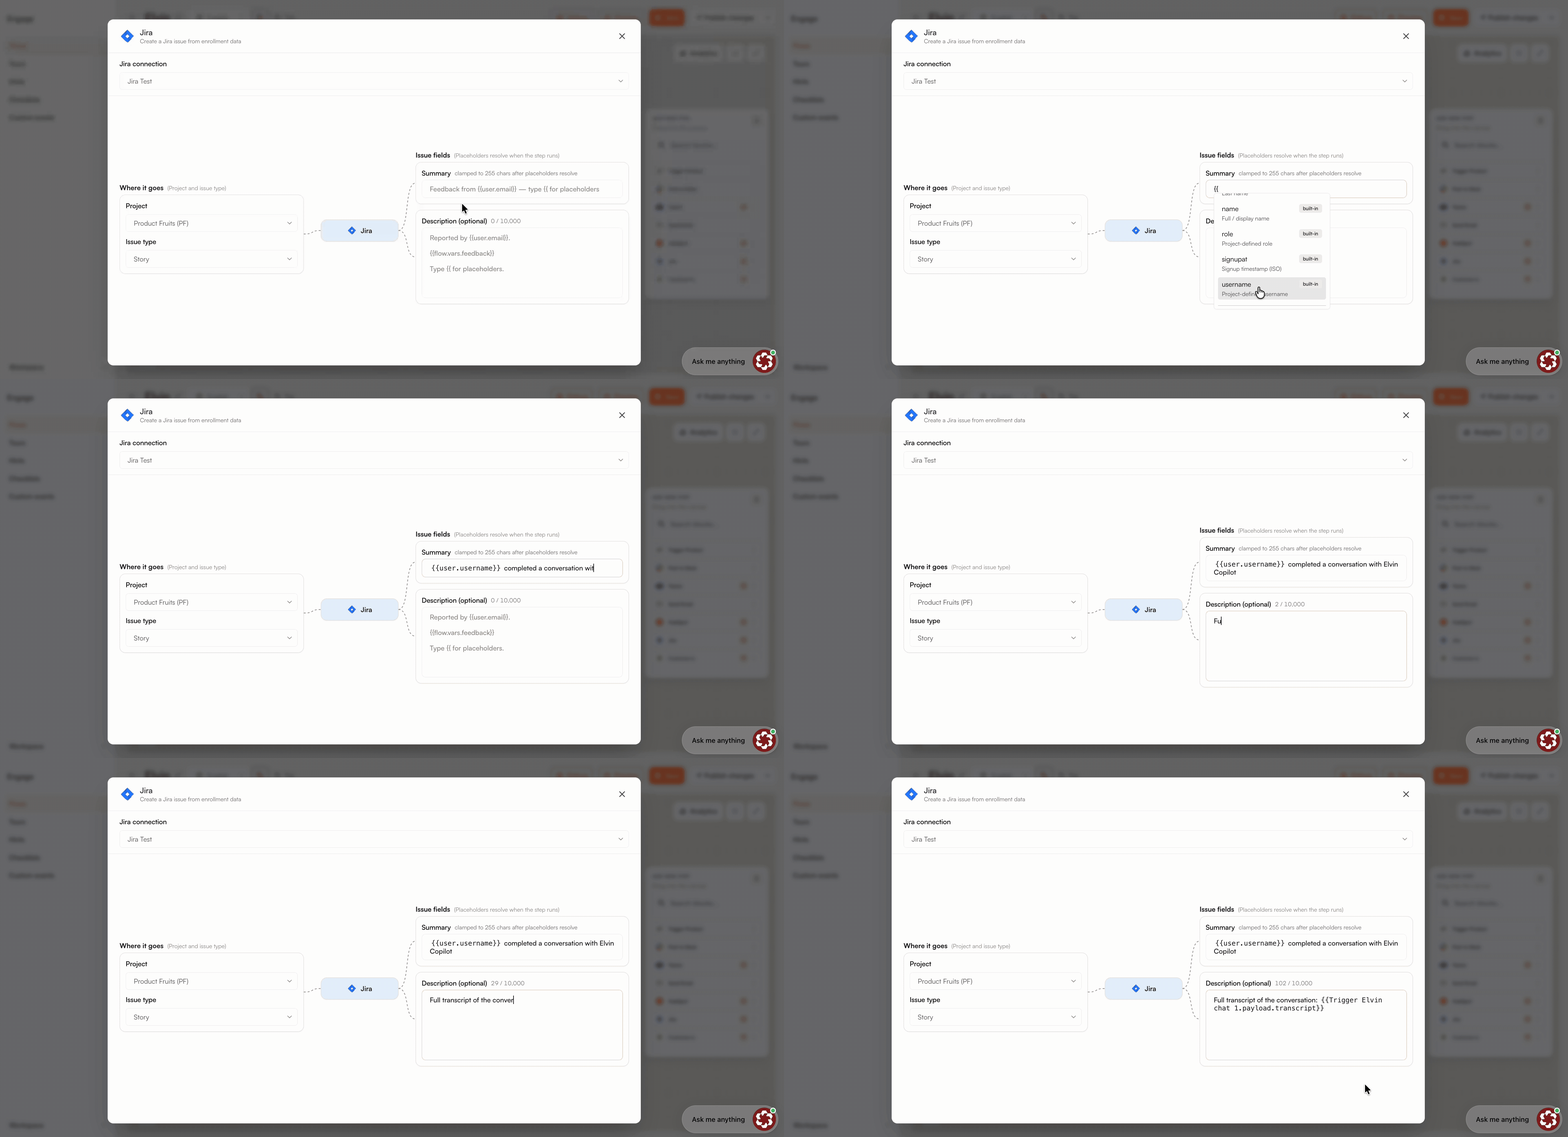
- Under Where it goes, configure the issue destination:
- Project: Select the project where the issue should be created. Only projects where the connected Atlassian account can create issues appear in the list.
- Issue type: Select the type of issue to create, such as an epic, story, bug, task, feature, or request.
- Complete the issue fields:
- Summary (required): Enter a short title for the issue. The Summary is displayed on the Jira issue card and in places such as the project board, backlog, and search results. You can enter up to 500 characters in the editor. When the Flow runs, placeholders are resolved, the summary is converted to one line, and anything beyond 255 characters is removed. If the resolved summary is empty, the issue is not created.
- Description (optional): Add detailed information that should appear inside the Jira issue. This field accepts plain text of up to 10,000 characters and is suitable for longer content, such as a complete Elvin conversation transcript, feedback details, or additional context collected during the Flow.
Use Placeholders
The Summary and Description fields support placeholders. You can use them to include user information or values collected earlier in the Flow.
See Using placeholders for the supported values and instructions on adding fallback text when a value is unavailable.
Example: How the Issue Appears in Jira
In this example, the Jira step follows a Trigger Elvin chat step. After the user completes the conversation with Elvin Copilot, the Flow creates a Jira issue containing the user’s name and the full conversation transcript.
The Jira step uses the following issue fields:
Summary
{{user.username}} completed a conversation with Elvin Copilot
Description
Full transcript of the conversation: {{Trigger Elvin chat 1.payload.transcript}}
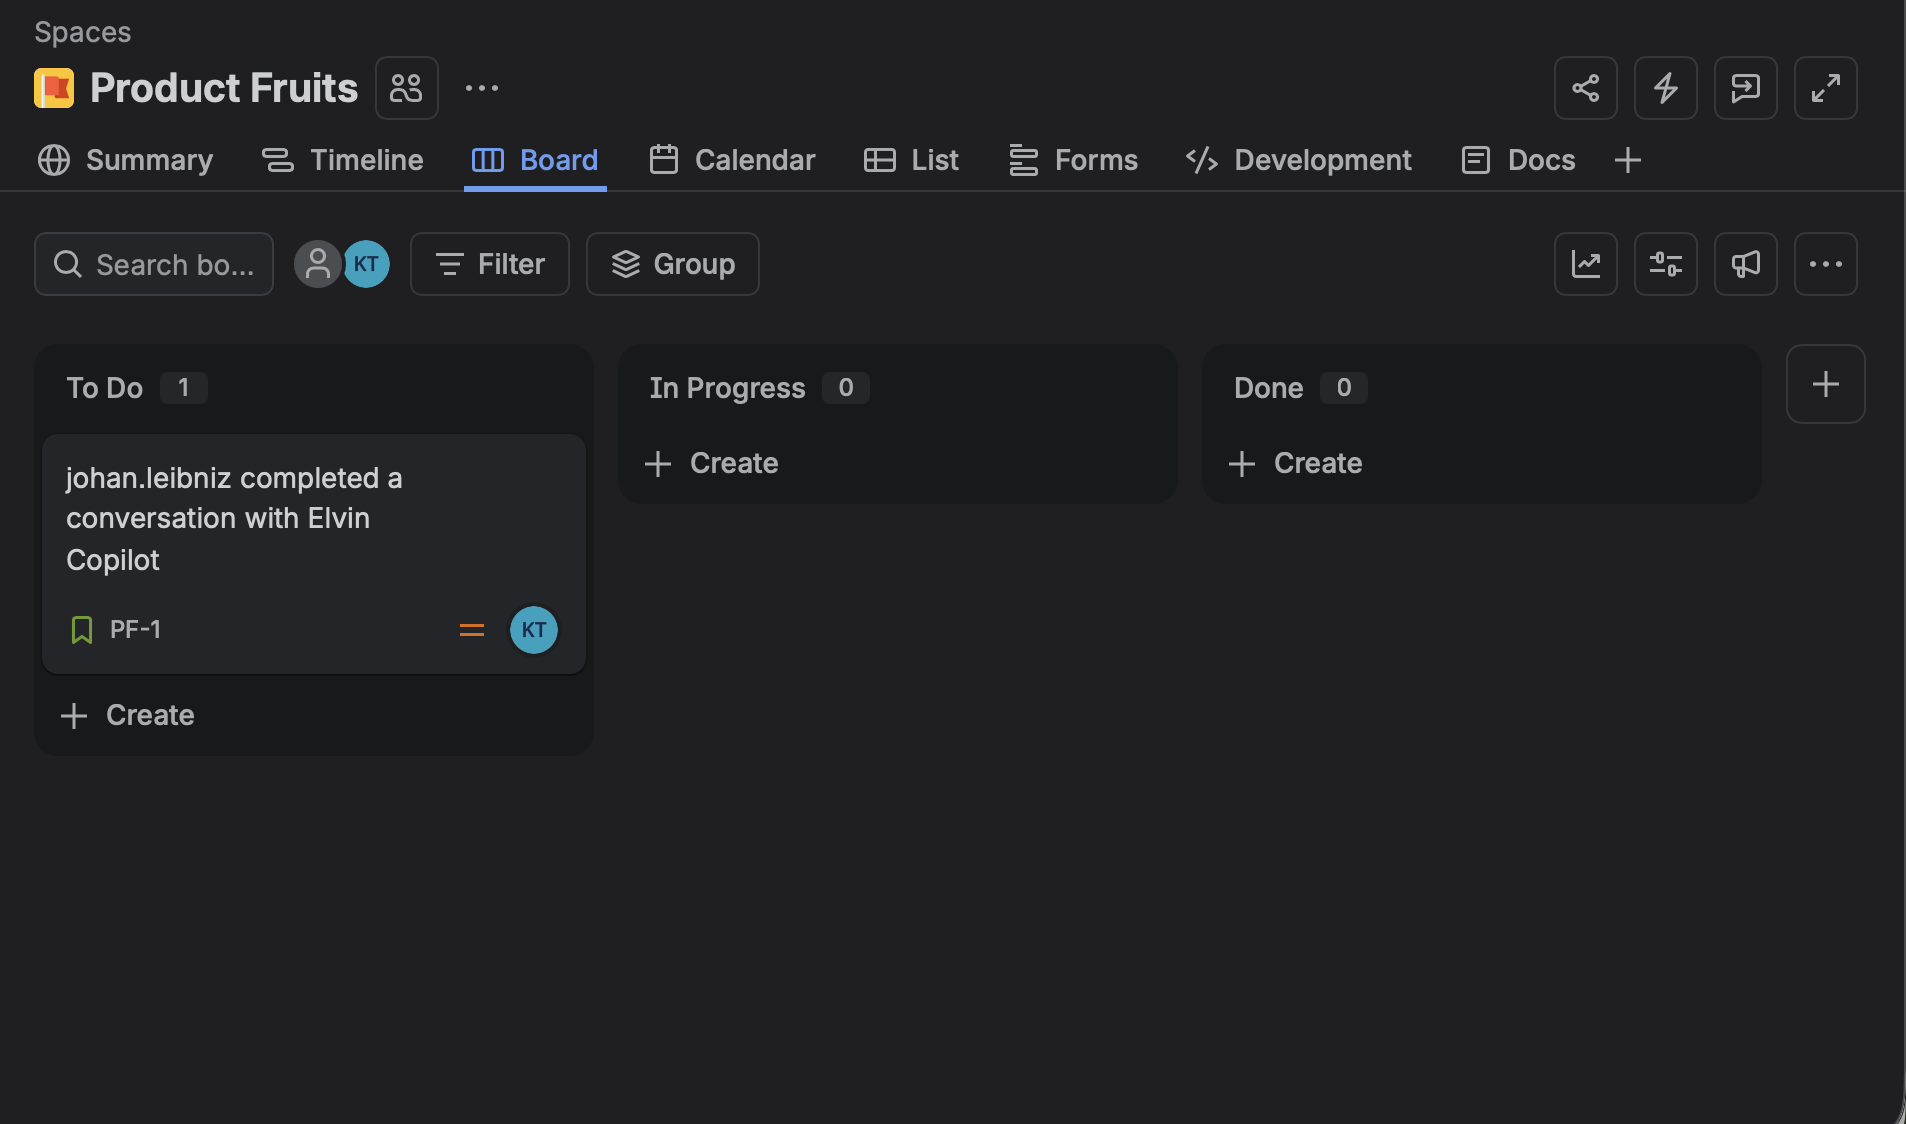
When the Jira step runs, Product Fruits replaces the placeholders with the user’s actual username and the transcript returned by the Elvin chat step. The resulting Jira issue displays the username in its title and the complete conversation in its description, as shown below.
Handle Failed Issue Creation
Enable Failure branch and connect it to another step if you want the Flow to follow an alternative path when the Jira issue cannot be created.
If issue creation fails, the Flow follows the connected failure branch instead of stopping.
Debug the Jira Step
Use the Jira step’s debug logs when an issue is not created as expected or when the Flow follows the failure branch.
Select a run to open its details. The information at the top identifies the specific Jira step execution:
- Action: The name assigned to the Jira step.
- When: The date and time the step ran.
- User: The Product Fruits username associated with the Flow execution.
- Enrollment: The identifier of the user’s enrollment in the Flow.
- Run: The identifier of this particular step execution.
- Connection: The identifier of the Jira connection used to send the request.
Use the copy icon beside the Enrollment or Run identifier when you need to share it with Product Fruits support.
Request and Response
The Request panel shows the request method and the Jira endpoint to which it was sent. The Response panel shows the response code and how long Jira took to respond. For example, a 201 response means that Jira created the issue successfully.
Request and response headers and bodies are not stored for successful executions.
Find and Filter Runs
Use Search by username to find executions associated with a particular user.
Use the Status filter to narrow the list by the overall outcome:
| Status | What it shows |
|---|---|
All | Every execution, regardless of its outcome |
Success | Executions where the Jira issue was created successfully |
Failed | Executions that did not create a Jira issue because an error occurred |
Skipped | Executions where Product Fruits did not send a request to Jira |
To investigate unsuccessful executions, click Add filter → Error type.
Error type | What it means |
|---|---|
All | Every error type |
Configuration | A required setting is missing or invalid, or a required placeholder did not resolve correctly |
Rejected by provider | Jira received the request but rejected its contents |
Authentication failed | Jira could not authenticate the connected account; the API token may be incorrect, expired, or revoked |
Permission denied | The connected Atlassian account does not have permission to perform the requested action |
Not found | Jira could not find the selected project, issue type, or another required resource |
Rate limited | Jira temporarily rejected the request because too many requests were sent |
Send limit reached | Product Fruits reached its sending limit and did not send the issue |
Provider unavailable | Jira was temporarily unavailable |
Unexpected error | The execution failed for a reason that does not match another category |
You can combine filters. For example, select Failed under Status and Permission denied under Error type to show only failures caused by insufficient Jira permissions.
Select the refresh icon in the upper-right corner to load the latest executions.
Limitations
- Only Jira Cloud sites with an address ending in
.atlassian.netare supported. Jira Server and Jira Data Center are not supported. - The Jira step can create new issues. It cannot update, comment on, or transition existing issues.
- The step supports the Project, Issue type, Summary, and Description fields. It does not support priority, labels, assignees, components, due dates, or custom fields.
- The step cannot be used with a project that requires additional fields when creating an issue. Before configuring the step, open the project in Jira and check which fields are required for the issue type you intend to use.
 Need more help? Book a demo with our team of experts.